Saturday, June 14, 2008

LindaF Admin - Fun Facts for Know and Tell

I am moving some of the information form the sidebar to an entry for reference:

Where are you getting your fabric from:

stash - I already have my fabric
55 (61%)
I need to buy fabric for this project
34 (38%)


Where are you from?
USA
44 (66%)
Canada
9 (13%)
Australia / New Zeeland
2 (3%)
UK / Ireland
2 (3%)
Germany
2 (3%)
France
1 (1%)
Netherlands
2 (3%)
other
4 (6%)
total 66 voted

Don't forget you have three days left for indicate which pocket you are inserting in your coat. And if you indicate "other" please put a comment in this post to let Marji what kind of pocket you are using.

Thanks everybody!!!

Lisa: First muslin photos UPDATED 6/16/08


Hi,
Guess I'll have a go at this....here is the front and back of my muslin (V8346). I put on a long sleeve shirt and a sweatshirt to try this fitting (it was only 93 F or 33 C that day). First things: SBA, let out the waist, and raise the bust point. You were right Marji, I only needed to add about 1/2 " (1.25 cm) from the shoulder to the bust. However, I had already traced off the pattern with my length adjustments and figured it would be an easy tuck on the pattern if it didn't work. Next, the back view. I see some wrinkles at the armholes. Could be a couple of things. One is that I didn't trim to the seam lines of the armholes. The sweatshirt has a deep armscye and could be pulling the muslin. Another thing that could be causing the wrinkles is the lack of shoulder pads. If it is something else I am not sure what could be the problem. Don't you love the shorts and the pink backdrop? My daughter took the back view photo in her room.

You can't see them in the photos, but I marked the grainlines, bust, and waist lines. The bust lines are off, but I think I didn't get them marked correctly on the pattern. The waist hits me just right and I am hoping I can make it just a little longer. Will have to see what happens when I lay out the pattern.


Update

Here are 3 photos of me trying to follow Marji's guidelines for muslins.
I have sewn around the armscyes and front edges so you can see where those are hanging out. I drew the bust and waist lines in black ink. I drew the grainlines in red. And that took some doing to figure how out to put those 2 different colors on the same photo!!

Changes:
1. I have pressed my seams and trimmed the sleeve allowance to 5/8ths inch.
2. I have inserted shoulder pads.
3. raised the bust
point by about 1/2 inch
4. released the waist 1 3/4 inc
hes.


I still have drag lines in the back and my grainlines on the side are off. Seeing how I don't need a FBA (ha, ha) , what else would be pulling my grainlines up in the front or down in the back? I am getting out my sewing books to try to figure this one out.

:)


Friday, June 13, 2008

Ms. Fine Fabrics' Jacket

My coat is to be made from a cashmere and super 190 wool, which means it has an incredibly soft hand and drape, and is very, very light weight. In our Santa Barbara climate, 72 degrees and dry, except on rare occasions, one heavy coat a decade is enough. A black jacket is indispensable and I have none. Since I plan to wear this one until it is threadbare, I would like to take the time to do an absolutely perfect job. The jacket is already underway. It is based upon a Montana design made for Vogue Patterns, #2649, which I chose because I made it last year color-blocking a reversible charcoal-to-white cotton-linen blend.The pattern has already been altered to fit perfectly.

For my black jacket, I wanted a more formal look, so I have lengthened the sleeve, and plan to add a series of small buttons to the cuff. I've also dropped the safari pockets, and instead, drafted a pocket within a seam running horizontally at the hip. I plan to top stitch the seam line and pocket with a prick stitch of "heaviest weight" black silk thread on wooden spools, I bought 30 years ago at Marks Tailoring Supply at One Figueroa Street in downtown Los Angeles. It no longer exists, but that one time visit Mrs. Marks store is one of my fondest shopping for sewing memories. I did stock up on supplies for a lifetime.

Just as Anne suggests, I chose the underlining or "canvas", to match the weight of the fabric. I ended up using a piece of Robert Kaufman's Seacell we have here in the store, for no other reason than it felt right when I draped the two fabrics over my hand together. It is similar to a tightly woven, or satin batiste.

I have supported the shoulders with a bias cut piece of wool hair canvas that we import from England. The shoulder reinforcement is pad stitched only to the underlining. I am using Acro (70% rayon, 21% polyester, 9% hair) to interface the lapel. This will be pad stitched to the fabric, and for this I will use a very fine grade of silk thread. It says here it is 50 weight, but it sure feels right so I'm using it. I was taught to use a linen tape to support the roll line, but this fabric is so fine I thought it best to use a piece of rayon seam binding instead.

It has been awhile since I took the time to tailor a coat or jacket, so I am using for reference, my old class notes, "Classic Tailoring Techniques - A Construction Guide to Women's Wear" by Roberto Cabrera and Patricia Flaherty Meyers, that I picked up at the California Mart Fashion Bookstore, and "The Great Coat Sew-Along".

Q&A #4, Underlinings,

Marji said...

Thanks Ann,
Can you comment specifically on the Cashmere blend (you have it in orange and fuschia at $18/yd) coating wool - is the cashmere content high enough on that coating to warrant an underlining?

Gorgeous Things said...

Hi Marji,
It's a pretty tight weave, and it should hold up without an underlining. If you want to underline a cashmere blend or cashmere like that, I'd use a cotton batiste.
HTH!
Ann


Melissa Fehr Trade asks....

Kay Y, I've got a question about adding the walking ease that wasn't really answered by domestichaven's instructions, either. In the last photo you showed adding the wedge to the front facing's edge, but the CF is actually a few inches off the edge because of the coat's overlap. Is it okay to just add the wedge to the side, or do we need to cut up the CF and pivot to add the wedge in the middle? (Forgive me if that's a dim question, I don't know much about pattern alteration, being a very lucky standard size)


Marji said.....

I'm going to find RC's book today (I looked yesterday but it buried itself in a pile and is hiding) and re-read her directions, and I'll dig out Sandra Betzina's directions too.
Last time I read R. Carr's directions it appeared to me that she writes those directions for adding the walking ease along the CF. I'm not sure how she's treating a double breasted coat. or even if it's an issue in a double breasted coat. Melissa, I have to think that adding the wedge on the side seam would be pointless.

Nancy, I've done it both ways, and seen it done both ways. The vintage Vogue pattern I'm using has the turn of cloth allowance already drafted onto the collar - I took pics and will post them later today.
Truth: I'm thinking that if you remember to draft the additional onto your upper collar before cutting then that's the way to do it. If you don't think of it until you're already cut, and the pattern wasn't drafted to include the extra, then you trim off the undercollar when constructing. Sometimes I think the answers are just that pragmatic.

EJVC's coat plans

Hi everyone - sorry about the accidental publishing of a blank post for those of you who saw that... I'm not sure what happened.

I'm a bit behind the curve because I haven't been able to find just what I wanted. I wanted a traditional coat so that I could take advantage of all the expertise here, but then I couldn't find a pattern I wanted and wasn't sure I could afford the super cashmere of my dreams etc etc.

So I'm pretty sure now that I've hit on the solution. I saw Johanna Lu's version of the coat from Vogue 2988 and loved it - so much that I went and bought the pattern several months ago. Anyway I realise that I have enough of a lovely navy wool melton to make it, which as far as I can tell is perfect for the pattern, whose suggested fabrics are "lightweight tweed, lightweight fleece and lightweight crepe" but calls for full interfacing. JL made hers out of a felted wool without interfacing and I thought I would do the same. I need lining and notions but otherwise I am good to go. First stop, muslin! I am very happy to have made my decision.

For those more experienced than I: I've never sewed with wool melton before. I did wash it in the machine on the wool setting and line dry it - it's ultra-beautiful. In my "Fabric Savvy" book by Betzina, it says the following under seam finish: "Butt edges together over 1 1/2 inch wide wool jersey strip. Machine-sew a featherstitch. This joins the layers of melton while attaching to the strip. Trim down one side of the wool jersey strip, and wrap the other around and hand-stitch." So - do you think I should butt-join the seams as this suggests? I've never done it before but I'm game. Second, as it's lined I wouldn't think I would have to trim, wrap, and stitch the wool jersey strip but I don't know - does it have to do with making the seam stronger? Also, Betzina suggests silk thread, I am concerned that it won't be strong enough (I've never sewn with silk thread before). Finally, she suggests eliminating hem allowances and binding the hem with wool jersey or leather - I can't imagine that working on a lined jacket. Any suggestions?

EDIT: I notice in Johanna's review for PR that the coat doesn't have pockets! Major problem in a winter coat! I think I'd like to add welt pockets, since she says the seams aren't suitable for side seam pockets. I think I have maybe made one set of welt pockets about 20 years ago... does anyone know why it wouldn't be a good idea other than my lack of skill?

Elizabeth

Ann Steeves: Underlining Coating Fabrics

Hi folks! It is so inspiring to see what people are doing. I've been AWOL on this list because it's so busy right now, but I think I'm going to join in and sew myself a coat.

Marji asked me to talk a bit about underlining coatings. Forgive me if you know this already.

What is underlining?
Underlining is a layer of fabric that is attached to your coating shell fabric. It's cut from the same pattern piece and attached to the wrong side of your fabric. Those two pieces of fabric are then treated as one. Underlining provides support to your coating fabric, eliminating stretching, bagging and pulling. It also adds a layer of warmth. And if you have a loosely woven fabric like a bouclé, it reinforces that fabric at stress points. It also acts to conceal seam allowance show-through in certain fabrics.

Fabrics used for underlining
You can use lots and lots of different fabrics for underlining, depending on your desired result. The underlining can either match the hand and drape of your fabric, or you can choose an underlining that will alter the characteristics of your fabric. In the majority of cases, I recommend matching your underlining to the drape, weight and hand of your shell fabric.

I've used many different underlining fabrics in coats. One of my favorite underlining choices is a plain, firmly woven cotton batiste. I've found that it supports your garment without adding any weight. It doesn't change the hand of your fabric, and it doesn't grab your shell fabric. Another great choice for underlining is silk organza. Unlike batiste, it can change the hand of certain fabrics, though with coating it is not as much of an issue. I have had problems with organza and certain types of wools. Organza and crepey and "hairy" wools and fur fabrics tend to grab at eachother's fibers and cause some weird pulling. But it's a great underlining for many bouclés, silks and blends.

I live in Boston, which can get mighty cold and raw in the winter. I made a bouclé coat several years ago. You can see a review of it Here. This fabric, while luxurious and beautiful, does a bad job of cutting the Northeast winds that whip in off the ocean here. To shore it up, both structurally and from an insulating standpoint, I underlined it with a cotton flannel. The flannel makes the coat toasty warm, but not bulky.

Attaching the underlining
First - pretreat your underlining. Shrink it before you cut into it, so you don't have a disaster later. Also make sure you cut your underlining on the same grain as the fabric. For precision, use a single layer cutting layout for your underlining. After all, if you're taking the time to do an underlining, you might as well take the few extra minutes to get it perfect, right?

Once it's cut, I attach the underlining to the fabric by hand basting it to the body of the fabric. My basting stitches run parallel to the grain of the fabric. They are 1 to 1 1/2 inches long, and I catch just a thread or two of my shell fabric at each stitch, as you can see here:


This takes time, but it's far superior to basting only at the seamlines, because it structurally reinforces the shell fabric. This is critical for areas that will receive a lot of stress from being bent and sat on, like elbows and rumps. It helps your fabric retain its shape. It's really, really important if you're using a cashmere or fur fabric, which has a tendency to bag out.

Do I always have to underline?
Like I said above, certain fabrics really do need underlining to hold up to the stress the average coat takes. Bouclés, cashmeres, fur fabrics and blends? You bet. You'll be far happier with the results if you underline. Boiled wools, flannels and meltons? It's not a requirement. Here's how I determine whether I should underline a coating. Take an 8 inch square of fabric. Mess around with it. Drape it over a ham or other rounded object (your bent knee is good for this exercise). Pull it in all directions. Try to approximate things like the bend of your elbow. Give it a good workout, then see how it recovers. Press it and see if it retains its shape or not. That will give you a good idea of whether you need to underline. Also, think about the use your coat will get. Is it going to be THE COAT for winter? Underline it. If it's only going to get occasional use, and it's a very tightly woven melton, then you can get away without underlining. It's your call.

I hope this helps answer some questions you might have. I'm really enjoying watching the process. I hope I'll be able to join in!

Ann Steeves

.......................
From the comments:
Marji said...

Thanks Ann,
Can you comment specifically on the cashmere blend (you have it in orange and fuschia at $18/yd) coating wool - is the cashmere content high enough on that coating to warrant an underlining?

Gorgeous Things said...

Hi Marji,

It's a pretty tight weave, and it should hold up without an underlining. If you want to underline a cashmere blend or cashmere like that, I'd use a cotton batiste.

HTH!
Ann

Thursday, June 12, 2008

Nneka: From Teal to Tangerine


My teal wool blend didn't quite work out as I imagined (see my blog entry here), so I ordered the Bright Orange wool/cashmere blend from Gorgeous Fabrics and a creamy, yellow silk jacquard from Denver Fabrics to make up my coat. I'm making Vogue 2935, a semi-fitted, hip-length coat.

I've gotten most of my notions and supplies, but I haven't yet decided what to do about underlining. Truthfully, I'm waiting to see what others who are using this fabric choose to guide me as I don't really know what I'm looking for in an underlining. From what I've gleaned on this blog, I figure I need some sort of underlining to support the cashmere portion of the blend so it doesn't bag out in elbows. I also plan to take my fabric to the only couture fabric store in my area that I know of, Richard Brooks, to get some advice and actually feel the possibilities available like Marji did in her earlier post.

I'll be tracing off my pattern and doing some flat pattern alteration work this weekend.

Constructing and Fitting the Muslin, Part 2

Note: This is a work-in-progress post and will be updated frequently as I make changes.

[Excuse the early AM photos. DH got in last night from a 3-day business trip and I had to nab him to get some pics before he left this AM.]

There's work to do.

First try-on reveals several problems. I'll make adjustments one at a time, and start at the top.

  1. The slope on the shoulder is too great, and I need to change that. It's fine at the neck edge, but I'm more square-shouldered than this pattern. There is also no room at all for a shoulder pad in here, not even to try on for the first fitting. The dotted line on the shoulder in the second frame shows how I'm going to open this up.

  2. The shoulder seam is angled just a tad too far back on me. (See detail photo below) I'll take a picture of the way that I change this. What I'm going to do is use some of that 2" seam allowance and move the shoulder seam forward

  3. The pictures also show that I didn't do enough of an FBA. See the drag lines the arrows are pointing to? See how the waistline marking is lifting up from the side seam toward the CF in the 3rd frame? I'll add that, after I open up the shoulder and try it on again.

  4. The back is showing some serious drag lines too, but I think a lot of that will be solved by changing the shoulder seam

Always start at the top when making alterations/adjustments, and make them one at a time.

As always, if you click on the picture it should open up much larger on your monitor.


I expect that when I release the shoulder the back waistline marking will come back into alignment. The front won't until I allow more room for the bust. (Note that I was very careful lifting my arm to not lift the shoulder at all so as to distort the fitting lines)

Fortunately, I haven't cut my sleeves yet. Because I'm going to add that much to the top of the armscye, I'm going to need to change my sleeve cap.

••••••••••••••••••••••••••••••••

Later in the day...


The original shoulder line is indicated by the stitching lines on the muslin. The yellow lines indicate me moving the shoulder line forward 1/2" to put it where the shoulder is on my body. The blue line indicates the 1" that I added to the outside of the garment to raise the shoulder—in part because even without a shoulder pad this was too much an angle on me, and it left no room for a shoulder pad.

After I moved the shoulder seam line, I added 1" equally to the front and the back. In the photos below the shoulder pad is recessed a bit, but not as much as it appears in the photo. You can see that opening up the shoulder took care of some of the issues with the FBA too.

Next I cut open the seam line over the bust. It spread 3/4" upon releasing the stitches. When I look at it straight on, the front seamline is in the right place, so all of the additional fabric that I will need to add will have to come from the side front.

This is why I go through this process. Every time I think I've done enough flat pattern alteration, and it's going to be a waste of time to make the muslin, I'm proven wrong.

I invite everyone who's in the process of fitting their muslin to post photos to gain the input of those here who're sewing along—and no, you don't need to draw all over them like I have. I've found that the camera is a thousand times more revealing than my mirror when it comes to fitting. Do try to have someone else take your photos, or use a timer and a tripod (or shelf). Lifting your arm enough to take the photos yourself will distort your fitting lines.

Wednesday, June 11, 2008

Claire S. - A Bit of Progress

I’m starting to make some progress – I’ve got my wool flannel London-Shrunk, I can pull a thread right across from each end and the grain’s been straightened. The underlining flannel has been prewashed (multiple times). Decided Kasha lining will be the way to go for our Montreal winters, but haven’t yet purchased it – I will, with much optimism, hope it goes on sale before I need it…If not, I’ll get it anyway, there is a dark red I really like.

I bought real muslin and am about to start…will cut out & press the pattern pieces tonight. Evenings are so short, I don't get much done at a time.

Blogging is new to me (as in just the past few weeks !), soon I’ll figure out how to post a picture :-)

Rosemary's coat


I am making the Butterick pattern 4665 view D. The pockets are in the seam. I have cut out the tissue pieces and have put the pattern somewhere, I am still looking.I found it. Yeaaah. I have fabric for the muslin. I will be using olive green wool blend melton cloth from Fabircs.com and silk tie jacquard from Fabric Mart. The silk was easy to find a thread to straighten the fabric, the wool melton is difficult.

Alethia's Fabric Choices

This fabric is a polyester/cotton knit. Its black & white. It has some stretch to it. I bought it last fall. The lining is a satin called "satin pauva". The spelling might be off. It has a french name ? Anyway the satin is the lining fabric.


I stop at one of my favorites fabric store (is off the beaten path) to buy lining and interlining for the black & white knit fabric. Guess what I found the fabric in the photo below. I bought the same type of satin in a light cream for the lining. Just in case my DD decides that she wants the black & white coat, I have a back-up

Admin - What type of Pocket are you making?


Marji would like to get a feel for what type of pocket you are making. I have put up a poll on the sidebar for everybody to answer. It should be the top poll. Please indicate which type of pocket you are going to be making. I have disabled comments for this entry. By answering the poll Marji will be able to see what she wants at a glance rather than read through all the comments.

Thanks everybody. - LindaF

Marji: I see that there is a category for Other, and already someone has put "Other". If you're making the Other - can you please leave a comment to tell me what that is?
And, just to help you define them, I'm adding a picture to this post.
I'm at a bit of a loss for "other" at the moment.

Ah, one more thought. Your pattern may show one type of pocket. Know that you are not obligated to use that particular type. In-seam pockets can be used anywhere there is a seam to put one, welt pockets can be substituted for in-seam if you prefer that look, and faux welts can be turned to real welts.

Alethia's Choice

I finally decided which coat to make for the Great Coat Sew-Along. It was so hard narrowing it down to just one for this event. My choice is Butterick 5145. I choose this pattern because of its simplicity. I am running somewhat behind already. I am planning to use fabric from my stash. I don't have all my supplies. I am going to start working on the muslin this weekend.

Tuesday, June 10, 2008

Marilyn B's Coat Plans


Deciding which pattern to use for my everyday coat took me a while to figure out. After going back and forth with a couple choices, I finally chose Vogue 7978. I very much like the two-piece sleeve and the princess line through the shoulder. All the vertical lines will make it much easier to fit without distorting the original design. I plan to wear this coat over suit jackets. I also could not decide between two fabrics in my stash, a taupe wool/cashmere blend and a grey & brown tweed. Much as I love the taupe fabric, I felt my pattern choice was not special enough for it and I could find no other pattern I wanted to use with this fabric. Thus, I decided upon the grey & brown tweed from Emma One Sock which will go with much of my winter wardrobe. I plan to sew view D (the grey single breasted coat) hemmed just above my knees. I have ordered interfacing and lining, but still need to find buttons.

I also want a new short winter jacket, but that decision was much easier. I have a wonderful vintage pattern in my stash and a great piece of green wool waiting for it. The pattern is Vogue No. 482 which is a Couturier Design from the early 1950's. I want to make it a little shorter than shown on the pattern so that I can wear it with pants. There are fewer fitting lines and the sleeve pattern is only one piece, but with curved seams. Since this is meant to be loose fitting, I don't see many problems with fitting adjustments. The wool I chose is from Emma One Sock in a green Pantone 16-0435 if you have a Pantone color guide. This will be a cheerful color during winter and looks great with black, charcoal and most browns. I still need to find lining and a great button and plan to go searching for these in the next week. In the meantime, I can concentrate on fitting the muslin. This sew along gave me the push I needed to make this jacket.

Shannon's Fabric Prep

In a post below, Marji asked me to weigh in on washing and drying silk organza. I started a new post because there was no comment box to put this in - hope that's okay.

I "wash" every fabric with which I sew - all fashion fabrics, linings and underlinings. Everything I use gets at least a dunk in water before use to insure a more shrink-proof fabric and to remove sizing (my allergies go nuts if my fabric still has sizing in it and dry cleaning is out of the question for me).

On my blog, I have discussed how I deal with woolens and silks (at the beginning of this post, I discuss my prep work for silk dupioni, but I treat silk organza in the same manner).

If you don't want to read the posts, here's the gist of them. All my fabrics - silks, wools, cottons, linens, etc. get the following treatment. A twenty minute soak (no agitation) in a washer full of water and a capful of Eucalan. The fabric is spun out and then treated one of three ways. It's either hung to dry - I do this with wools that could felt (like crepe or flannel) and rayons that don't like heat. Alternately, I put the fabric in the dryer on low heat - hard wools (like gabardine) and silks (organza, dupioni, charmeuse, chiffon, the whole lot - they will lose some body, but I don't mind that). Or I put in the fabric in the dryer on hot - cottons, linens and most synthetics.

After the garment is made up, it continues to be treated in the same manner, although I try to do as much spot cleaning on my tailored coats and jackets as possible, so they probably only see a washer full of water maybe once a year, if not less. When they do get "washed", it's a quick soak, a spin and then they are laid out very carefully on a flat surface to dry. Finally, a 2-3 minute spin in a cool dryer to shake out any remaining wrinkles and finally a quick touch up with the iron.

In all the time that I have been treating my fabrics this way, I haven't lost one yet. However, if you have any misgivings about treating your fabric they way I do, try testing on a swatch first. Measure out at least a 6" x 6" swatch and treat it how you plan on treating the final garment - I recommend sending the swatch through 3 to 10 wash cycles to be sure all is well (sometimes a fabric won't start to act up until it has been washed several times). After each wash cycle, remeasure and really look closely at the difference between the swatch and the original untreated fabric. Sometimes the fabric doesn't change and sometimes it does. You need to decide if it does change, if that change is a desirable one (some really nifty things can happen to a washed fabric that you may really love).

I realize that I pretty much go against traditional wisdom, but I have no time for wimpy fabrics - if they can't handle my "mistreatment" at the start of a project, then they won't last long in my closet. Since, dry cleaning is not an option for me, I have to be pretty ruthless.

Cennetta: Vogue 8438


I finally decided which coat to make for the Great Coat Sew-Along. It was so hard narrowing it down to just one for this event. My choice is Vogue 8438 view A or B. This is a princess seam coat with interesting collar treatment. This coat has some versatility in the look by changing the fabric: cashmere, lightwieght melton, or Damask. These are a few options. I think the clothe belt of view C can serve as an alterative look for both A & B.


Last Tuesday I stopped by Vogue Fabrics on the way home to buy fabric. They had several nice wool coatins available, but I didn't like any of them for this coat. I found this Bright Navy at Gorgeous Fabrics, which I will order this week.


I'm a little behind schedule, so I brought the pattern with me to cut out. When I return home I'll be able to start work on the fitting. The lining, buttons, and other notions will be discussed in a later post.

My second and third options were V7979-D and S3966-A with sleeve from view B.


Happy Sewing!
C

Mary OK's Red BWOF Trench Questions


I've decided to put the red BWOF trench project on hold for a while, because sewing activities aggravate an inflamed tendon sheath on my dominant hand. I'm going to focus my efforts on a winter coat, for the purposes of this sewalong.

But I still have questions about whether to underline the gabardine or not. Tany recommended an article "Getting the Best of Gabardine," by Shermaine Fouche in Jackets, Coats and Suits (Taunton, 1992). Fouche recommends clean and simple construction methods to get the best of gabardine's natural drape: "Lightweight wool gabardine makes an ideal unlined coat for temperate climates. Such a beautiful drape comes from keeping the sewing and finishing simple -- soft fusible interfacing for cuffs, collar, and edges, and silky rayon tape binding for all the seam allowances."

I had thought I would use an underlining to support the trim. Marji suggested on my blog that I pose this question here, for Tany, Els, Kathryn, and others. Would a fusible weft or other interfacing provide the support I need for the trim, and hide the bulk of the trim inside the seam?

Marji's meanderings: browsing the web for a peek ahead

For anyone who does not have a tailoring reference, and wants a peek at what's to come, there are highly condensed directions for traditionally tailoring a coat or jacket on that Vintage Sewing Info site. However, if you're likely to get intimidated by having the whole thing outlined on one page, and it looks like a lot of work, don't look.

The order of construction is a little different than what I've done. I've never put a whole coat together before putting in the hair canvas and then shaping the collar, and they have you put the pockets in close to last, after your coat is constructed but just before the lining goes in. This step would assure you of perfect pocket placement, but requires handling the whole coat in the process of making a pocket.

For my own personal preference, I'd rather get my pocket placement down on my muslin (or toile if you're across the globe), then trust my markings and make the pockets when all I have to wrestle with are the full fronts.

For just plain fun on a sewing blog that I'll bet very few, if anyone participating here has ever read, is this called Sleevehead

AngelaO, and everyone else who's looking at their guidesheet that came with the pattern and are concerned that we're talking about things here that don't show up on your guidesheet, don't worry. We'll go through the whole construction process here, and you can merge these directions with those on your guidesheet to end up with a beautifully-made coat.

One of the reasons to do this all together is that today's guidesheets leave out a lot that should go into the construction of a coat. I blame it on the whole movement in the late 80s - 90s to make sewing "fast and easy."

Constructing and Fitting the Muslin Part 1

This is how I make my coat muslin. There are more ways than one to make a muslin from a pattern—I'm not saying this is the only way—it's just the way I do it.


My pattern includes 17 pieces. For the fitting muslin I am going to use:

  • front
  • side front
  • side back
  • back
  • upper collar
  • sleeve (this is a 1-piece that I will be converting to a 2 piece)
  • and welt
Step 1: Pattern

Press pattern tissue flat, then mark seam allowances.
(I'm using a vintage Vogue pattern, which is one size, and the seam allowances are marked on the tissue. Makes it nice for illustrating this .)

Pin main body of pattern pieces together on seam lines, and measure tissue.
Wearing ease for a fitted coat will be minimum of:
  • 4" in the bust (circumference)
  • 2" at the waist
  • 5"-6" at the hip
  • for the sleeve, at the bicep is also 4"
If you're planning to wear your coat over a suit every day to work:
  • 6" at the bust
  • 4-5" at the waist
  • 6-8" at the hip
These are minimums for wearing ease, and do not account for style/design ease.

Make any pattern alterations you need to make.
Extensive pattern alterations are beyond the scope of this sew-along. If you need help with altering your pattern I'd suggest consulting one of the myriad of fitting books out there or taking your questions to the fitting boards on Pattern Review and Stitchers Guild.

Here's a tip for drawing seam allowances onto pattern tissue for the Big 4: Use your standard tape measure as a guide. It's 5/8" wide, and typically the seam allowances for the Big4 are 5/8". Just lay the tape right on the cutting line and draw your seam lines on with a pencil.

Step 2: Place pattern pieces on muslin and transfer all markings, including seam lines, to muslin.

***Allow for 1" seam allowances on all vertical seams***

I have several large pieces of the old-fashioned wax tracing paper from Greenberg & Hammer (link on sidebar) that I use for this purpose.

Using a double tracing wheel with the spacing set at 1." I trace all my seamlines and the corresponding cutting line. Then I get out the single tracing wheel and make all markings, and trace the grain lines onto the fabric.

Not pictured: I remove the pattern pieces, remove the tracing paper, then cut the muslin out single layer, cutting on the outlines of the 1" lines on all the vertical seams. I cut 5/8" seam allowances on armsyce and neckline seams.

Be sure to label each pattern piece as you cut it with the piece name (e.g., "side front"), the pattern number, and the name of who the garment is for. It's always nice to remember to put a date on the pieces too.


Step 3: Stitch all lines on muslin with machine basting stitches.

This is obsessive and excessive, I know. But, when I try this muslin on my grainlines and other markings will be visible right and wrong sides, and as I work with it my markings are not likely to disappear on me.

I've stitched along my seam lines, my CF and CB, my buttonhole placement lines, hem lines, and horizontal lines marking both waist and hip.

This is also obsessive, but I stitch all my marking lines in one color family. Here I've used red and burgundy (whatever I have sitting around in old thread). Then when I baste the entire garment together, I've used threads in the blue family. That way, when I need to release stitches during fitting, I cut and pull on the right threads. Ask me how I learned to do this.

Step 4: Assemble the body

For the first fitting stitch together the main body pieces. No sleeves, collars or pocket welts at this point.

You'll notice that my waistline markings don't match up front to side front. I realized this was due to the pattern alteration I did, and I didn't re-verify my match points. I'll re-mark this on the muslin after fitting but before transferring the marking to my wool.

I am now ready to try this on, but I need someone else to be at home to take pictures. Having tried it on, without benefit of a photographer, I can tell that I'm going to need to change the angle a bit on my shoulder seam, and I think I've got a bit of a fitting issue on the back. The pictures will tell, and then I'll need to make a decision about whether it's enough to take care of now, or if it is something that can be adjusted at the first fitting during construction.

__________________________________

The Collar

There has been quite a bit of discussion already about the collar draft. KayY has posted about how she's added fabric to the upper collar for the Turn of the Cloth, and NancyK has posted about how she's trimmed off from the under collar of equally cut collar pieces, also to account for Turn of the Cloth. In any event, no matter how you accomplish it, you will want to cut your upper collar larger than your under collar.

The older Vogue pattern I'm using accounted for this in the pattern draft. It is highly unlikely that you'll find any contemporary patterns that have this feature drafted in.

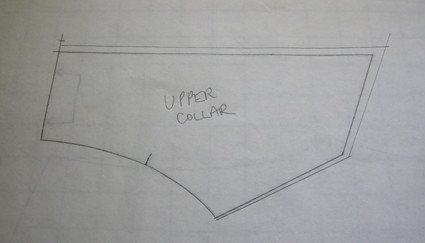
Notice the difference between the under collar and the upper collar. The upper collar pattern piece is directly below the under collar and is lined up at the CB.

After we get the muslins all fit, and you have your collar the size you want it in proportion for your coat and your body, then I'll assemble all the info into one post so that you can cut your collar pieces to account for the Turn of the Cloth.

Another interesting shot of the front piece of the vintage pattern I'm using. Notice the seam allowance on the pattern tissue is 3/4"

Monday, June 9, 2008

AngelaO's Coat


Sorry that I'm late publishing my plan. I read about 70 sewing blogs to get my "fix" since I haven't been able to find time to sew. I just graduated college (late, I've been 29 for a while), got a "real" job, and moved to the D.C. area from a very rural area. I relined my winter coat in December and didn't find it that difficult so I knew I wanted to make a whole coat. However, it is intimidating to get started. I was very excited when Marji suggested a coat sewalong. This was exactly the push that I needed.
Several months ago, I participated in a contest that Ann (Gorgeous Things) was having and I won a Patrones magazine (No 249). What a wonderful magazine!!! I saw this coat and knew that this is what I needed. I have several very professional and somber looking coats but nothing fun. I wanted a coat that would be perfect to wear during a snowball fight, something that would look great with jeans and tennis shoes. I purchased royal blue wool/nylon for this project (from Gorgeous Fabrics) and I am still looking for the perfect lining. I would like flannel backed satin in a cool print, like martians or polka dots. So far I've found Hello Kitty and Tinkerbell, however I'm looking for something a little less girlie.
The first obstacle that I will have to overcome is that the extent of my Spanish covers food, beverages, and where is the bathroom. I was able to translate most of the instructions except "poliamida a cuadros", does anyone know what that means? I have no idea how many buttons I will need, but I guess I will find out once I trace the pattern.
I'm really excited to follow along with all of you, I can't wait to see all of our finished creations!!

Happy sewing,
Angela

Sally: Great Fabrics at Baer, Lagging Behind

Hi All:

I am lagging behind I see - waiting for some fabric to be delivered, still dithering between two patterns, etc. I will get myself together this week!

I was just browsing the Baer Fabrics website (from Louisville, KY). They have some lovely wool on sale if you haven't selected yours a yet - they are hidden in the sale categories shown on the left side links.

Admin: a preliminary list of who is sewing what

Yesterday, when I was talking with Els, she asked if we could put a list on the sidebar of who is making what pattern.
Before we do that, I quickly gathered the info from previous posts on plans and made a preliminary list. Some of you have multiple choices but not a decision, so your entry may not show here, others of you are still deciding.
It will be nice to have a list so that you can all see who is making the same pattern as you.

so, update us in the comments, ok?

BWOF 9/05.102 MelissaF, LisetteM, KayY
BWOF 9/06.103
BWOF 9/06.126
Cidell, MaryOK
Digs,
BWOF 10/06. LindaF
Burda 7855 LauraM, LindaF, Rose
Burda 8022 ChristineB, Dawn,
Burda 8171 Heidi
Burda 8292 NancySeattle, Silver Threads
Butterick 4663 SuitYourself
Butterick 4665 Adrienne, Sigrid
Butterick 5145 EricaB, Patrice, Jean-in-NC, Alethia
Marfy F1414 Jenny
McCalls 5247 Jamie, LindaDanville, Digs
McCalls 5513 Sandra
McCalls 5525 Lucinda
Neue Mode 23448 SuitYourself
Patrones n247.30
Patrones n249
Tany
Angela O
Simplicity 3672 Silver Threads,
Simplicity 4084 Silver Threads, NancyK, Susan (FabricLuver)
Simplicity 4403 ClaireC, Erin, Patrice, AnnB
Vogue 1032 Zoubida
Vogue 1266 Laura, Diggs
Vogue 2475 Caity
Vogue 2873 Marji, EricaB
Vogue 2884 PattiF, Susan (FabricLuver)
Vogue 2922 Marji,
Vogue 2935 Nneka
Vogue 2988 Elizabeth
Vogue 7978 LindsayT, Carolyn, MarilynB, MaryOK
Vogue 7979 Robin
Vogue 8299 Vicki
Vogue 8306 NancyK,
Vogue 8346 Lisa, Bonnie, Gaylen, ClaireS
Vogue 8438 KarenT, Adrienne, Cennetta
Vogue 8480 Bonnie, Patrice
Vintage or OOP editions Marji, CafeCouture, Shannon, Marguerite, MarilynB, BarbaraP, Susanne
Mens MichelleL, Jamie

Q&A Number 3

Dawn asks:
I just received my fabric in the mail; a flannel coating and a melton wool. I put 5" squares in the washer and dryer and it came out beautifully w/o shrinking much at all. Is there a problem with putting the wool in the washer/dryer? The melton seemed to not change at all and the flannel got a little beefier but basically feels the same. Do I dare throw them in the washer and then dry them? I would put them in separately.
Marji: Dawn, if you're not worried about your wool felting (and Melton is already felted to a degree) then if it's working for you, have at it. I don't recommend throwing your finished coat, with all the shaping of the lapels etc, in the washer and dryer. Typically you preshrink to the level you'll be cleaning your finished garment. I don't throw wool in the washer and dryer, but there may be some here who do. You want to be aware that everytime you put your wool in the washer and dryer it' s likely to felt a little bit more - continuing the shrink process. It has to do with the structure of the wool fiber. If someone has a wool that they have more than enough of, and they want to felt it a bit to make it more impervious to wind and cold, then felting it deliberately is a good idea.

fabricluver (Susan) asks about mounting the underlining to her mohair coating fabric.
Marji: I'll cover mounting underlining to the fashion fabric in July, for everyone who's mounting it. If you want to look ahead, there are pics of mounted underlining on fashion fabrics on the Diva's site and I'm sure on other sites, and in several published sources. For June I'm only concerned about getting fabrics prepped and getting muslins fit.


fabricluver (Susan) asks: One more question: should I preshrink the silk organza? If so, what method?
Nancy K responded: Preshrinking silk organza is easy. Throw it in the wash and dryer. I'd serge it together at the ends. Marji added: I preshrink silk organza by washing it in cool water, delicate, then line drying it—I don't throw my silk organza in the dryer. Shannon, do you want to weigh in here? I know you wash all your silks.

Marji: Upon further thinking on the shrinking "not much at all" phrase in Dawn's comment on washing the wool, I'm wondering how much "not much" is. Was it 1/8" over 5", 1/4" over 5", or more? Did the fabric shrink more in the warp than the weft? I remember doing some experiments a couple of years ago with wool flannel, and washing swatches, measureing them, then washing them again, and re-measuring. I don't have the swatches or data here at my fingertips, but I do remember that the shrinkage was not even, Warp/weft; and it was not predictable in successive washings.

I also remember starting knitting a sweater a year ago. I knit my swatch, and blocked it, and it grew in the blocking, but I wasn't concerned. After all, it was just a little bit. It was 1/4" over 4". Over the circumference of the sweater though - it added up to a lot. A 40" sweater, growing at a rate of 1/4" per 4" ended up at 42.5. Which changed the fit. I ended up ripping the whole thing out.


If your shrinkage is 1/4" over 5" on the weft, and you start with 60" wide fabric, you end up with 57" wide fabric.
If you also shrink in the warp, and you didn't buy extra fabric, you may not be able to lay out your coat. So be sure what your expected rate of shrinkage is, and figure out if you'll have enough fabric before you run your fabric through the washer and dryer.


Sunday, June 8, 2008

Marji: My thoughts and replies to weekend conversations

Hi All,
I'm back. DH and I have been traveling since last Thursday, and I've been on the net for less than 1/2 hour per day since then. I'm catching up on posts and will be making my muslin tomorrow and posting about the process.

I've only had time to skim the posts…

Thank you Kay for the detailed info re the collar. I'd love to have you re-post this, or get permission from you to post this again when we get to the point of cutting, and the assembly of the collar. You've got great illustrations and explanations there. You're just ahead of me, by a lot! (At the muslin fitting stage this isn't really critical, although I know some of you are thinking ahead through the whole project.)

Some of the ways any of the pattern companies (not just Burda) have you cut your pieces are not optimal. We'll be creating a separate piece and cutting the under-collar on the bias, regardless of what your pattern calls for. And we'll be looking at the methods of construction so that your lapels turn correctly and look right.

At this moment, the point of the muslin is to check the fit and the style elements on your body.

Els also posted about trying on your muslin over your typical winter clothes. She is so absolutely right, so crank your AC (and right here this afternoon the temps topped 95°F) and put on a sweater, or a suit, whatever you will wear under your coat. before you check your muslin for fit.

I'll list the elements to check tomorrow night when I write the muslin fitting post, but my suggestions are going to include checking the fit prior to putting your sleeves in:
  • Check the shoulder seam. Does it begin under the back of your ear at the neck edge and terminate at your shoulder point, or does it fall to the back? The way patterns are drafted lately it is very common to find that it falls to the back. This is why I've suggested cutting a 2" seam allowance at the shoulder—you may need to move the seam forward.

  • Is there at least 1" room in there for the height of a shoulder pad and seam allowances and lining?

  • Does your side seam fall vertically straight from the under-arm to hem along the leg, or does it swing to the back or front?

  • Does your CF match and button well, going over the intended clothes, and fall straight, or does it "V" in any direction?

Once you've checked your shoulder seam and vertical seams for fit, then you're going to put in your sleeves, and check again. You want your sleeve to fit the armscye and you, and you'll want to make sure you don't have any "biasing" of the sleeve on you. Again, lately, I'm not sure what is going on in the drafting room at the pattern companies, but I'm willing to bet that more than a few people are going to end up rotating the sleeves in the armscye to get a good fit with no biasing.

I'm going to suggest either cutting off the seam allowances for your collar and lapels and other design features, or pressing them under, so that you can see the size in relation to your body and decide if you like it or want to adjust it. I'm tall and have broad shoulders, and will sometimes adjust the design lines on a collar so that it doesn't look elf size. The same proportions that work on me won't work on either Shannon or Summerset (Forgive me Shannon and Summerset for citing you as examples). Where I'm the jolly green giant, they can check in as the petite Tinkerbelle. (There is a picture of Summerset and me on my blog, standing together—I'm not kidding about the contrast). It is important that your coat look like it's proportioned for YOU!

We'll also be checking pocket placement at the muslin stage.

The allowances I gave in the previous post—those are suggested. You will want to try your muslin on, over your typical winter garb, and determine if there is too much or not enough ease, for the way you like to wear your clothes.

This list is off the top of my head after dealing with flooding this AM up on the shoreline of Lake Michigan and then driving 7 hours, then getting in my swim (per the docs instructions), then grocery shopping.

I promise that tomorrow night I'll have a muslin fitting post up that you can all question or comment on, and use for reference.

Oh, bonus: I got to talk to Els on the phone this afternoon!! The sleeve heads for all the non-Euro folks are on their way here. I've also got all the other materials on the way, and will put together all the packages as soon as everything is in my hot little hands.

KayY: Adjusting my pattern

I'm editing to say that I didn't realize this post would be ahead of the curve on the sew-along - I can't help thinking about the details while I'm tracing the pattern.
___________

Dawn is WAAAY ahead of me! I have just traced the pattern for the coat I have decided to make, which is the same Burda WOF coat from September, 2005 that Melissa (Fehr) and maybe some more of you are using. Here is the picture from the WOF archive page.

Burda WOF doesn't give you all the pieces you really need for a good tailored coat, IMHO. There is only one collar piece, and in comparing the front facing to the fronts, there is no difference in the size or shape of the collar and lapels. However, you need room for the turn of the cloth in the upper collar and the facings because these pieces are what you see when you look at the completed coat. They have farther to travel than the underneath layers because they must roll over the under collar and the coat front. They need extra length to completely cover those pieces, and to boot, a bit of extra so the seam that joins them around the edges of the collar/lapel will roll nicely to the underside and not embarrass you by sticking up. The thicker your fabric, the more extra length you need.

If that does not make any sense, here are some pictures.

The first shows a collar which is being held flat, instead of allowed to roll on the roll line. You can see that the upper collar is bubbling up because it is bigger than the under collar.


The next pic shows the same collar on the jacket, rolling nicely and laying smooth over the back and shoulder of the jacket. That's because it has enough room in the upper collar to do so.


The last picture shows the underside of the collar, where the outer seam joining the upper to under collar rolls just a smidge to the underside so you cannot see it.

The jacket in the photos was made from a Vintage Vogue Paris Original pattern, and all the pieces needed were drafted by Vogue. Burda WOF needs a bit of help.


Below is the upper collar I have drafted from the WOF pattern. Because my coating is very thick, I have added about 0.75cm to the outer edge of the collar and around the points. At this moment I am not sure if I have done it right but my theory is that any part of the collar that has to wrap around and over needs extra.

Not shown is the under collar, which is basically the collar as given by WOF, plus a seam allowance at the CB, to be cut on the bias.

I have adjusted the upper lapel (front facing) in the same way.

I am adding to the upper collar instead of taking away from the under collar because of the thickness of my fabric.

I have also added a wedge to the CF for "walking ease" which has already been mentioned on this blog (Q&A 2 from June 6). I am not really sure it's needed for this double-breasted coat but what the heck - I can always sew it out later if need be. I do not have the Roberta Carr or Sandra Betzina books where this is apparently described, but domestichaven (from PR) posted the instructions on her blog.

In my case this amounts to a wedge which has an extra 3cm at the hem. You can see it at the bottom of the last picture.

Finally, (phew) in measuring this pattern I do not believe it has enough ease built in, based on the numbers Marji gave us in "Thoughts on the fitting muslin" (June 5) - i.e. for wearing over other jackets, 6" (about 15cm) at the bust and 6-8" at the hip (15-20cm). I traced a 38 at the bust and 40 at the hip and based on the body measurements for these sizes, there was 17cm at the bust (plenty) but only 9cm at the hip (less than 4"). Based on this I have added extra width at the side front and side back panel seams.

I would have made more progress this weekend but my excuse is that it's too hot here to think about a woolly winter coat ... I hope I can stick with it as it's only June!