
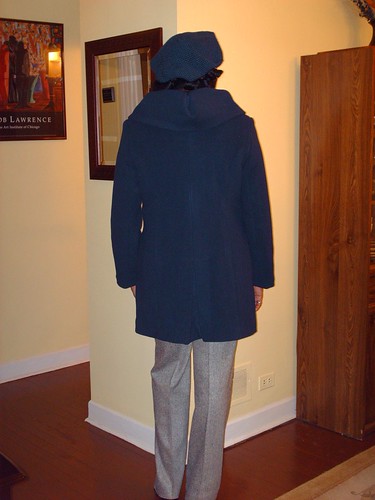
I got photos of the coat on me, so I'm adding them at the top of this post.
Link to All Photos in this Post
I got the buttonholes finished today, and now I'm completely done. I'm very pleased with this project. I don't have any photos of me wearing it because I dropped the camera on a cement floor while I was taking these photos, and that was the end of that!
I don't think you can see the shaping very well on the form, but it has a very nice, subtly slimming line, and has a lovely shaping to the side seam area, even though it doesn't have side seams as such. Marfy drafting shows its excellence once again, at least in my opinion.
The lining is silk charmeuse, and I used the same corded-look whipstitch with DMC floss to attach the lining to the body of the coat as I used on the pocket linings. I also attached the monogram circle to the right front lining in the same way.
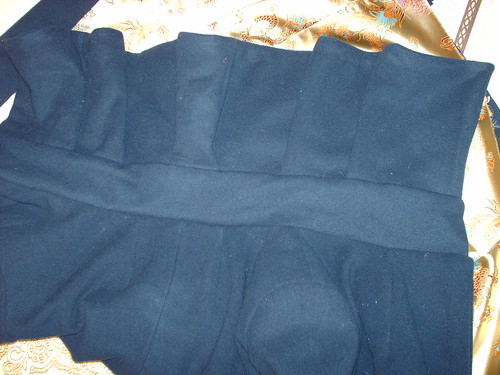
Here's a close-up of one of the buttonholes. I used the same DMC floss to make them as I used on the lining, etc.
The stitches are fairly large, and even at this scale they tend to disappear into the pile of the cashmere. I love the way the bead on the edge of the lips makes a perfect line, and I think the variegated floss adds just a little spark to it.
Here are the buttons buttoned through the buttonholes.
I want to thank Marji for spurring so many of us to start and finish a coat project. I know I would not have attempted such a complicated project with so many new techniques without her encouragement and knowledge.
Wednesday, December 31, 2008
Liana's Coat is Finished


Friday, December 26, 2008
Vogue 8438 - Finished Part III
For the past four years I have been fortunate enough to make at least one winter coat per year. Last year, I made a coat for the first time for DD; the year before that I made my sisters coats for Christmas; and three years ago I made a coat for the first time for myself.
Last Spring Marji created a blog called: The Great Coat Sew Along. She invited fellow sewists to participate. Each contributor selected a coat of their choice, posted the various stages of making it, and published the finished coat. Several bloggers and members of PR become contributors to this awesome movement. The Coat Sew-Along is a great source of encouragement and allow each participant an opportunity to take advantage of several tutorials posted on the blog. Big Thanks to Marji for creating and maintaining the site.
At the beginning of the year, the blog will be made available for everyone to view. Several people are still working on the final stages of their coats.
I finished my coat on Christmas Eve and am happy to post my final review of the process.
Pattern Description: MISSES’ COAT AND SASH: Loose-fitting, lined coat, above or below mid-knee has princess seams, front snap closures, shoulder pads, center back pleat and side seam pockets. A, B: ruffled collar and collar band, two-piece sleeve. B: purchased belt. C: standing collar, sleeve with cuffs and optional sash.
I made view A.
Did it look like the drawing: Yes, it did. I added a few inches to the length and made some fitting alterations.
Where the instructions easy to follow: No problems there. Typical instructions for putting together a coat with princess seams.
What did you like or dislike about the pattern/coat: The thing that drew me to this pattern was the "flower petal" shaped collar. I'm always looking for patterns with odd or different accents. The other thing that drew me was the sleeve variations. The sleeves for view C could easily be exchanged between a variety of coat patterns.
After I attached the collar to the coat, I fell out of love with the coat thinking the collar was too big for me and the coat. This back and forth with like/dislike happens occasionally as I go through the process of finishing a garment.
My sister saw the coat Saturday, and she just love it! Especially the collar! She already put her bid in for a swing coat made of "beautiful" wool. No hurry, next winter is fine.;-)
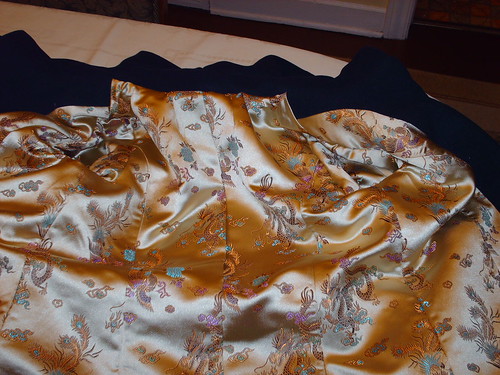
Fabric: Bright Navy - Lightweight Melton CoatingBright Navy - Lightweight Melton Coating purchased from Ann's Gorgeous Fabrics. The lining is a brocade from Hancock. I didn't underline the coat so I thought the brocade would help fight against the strong Chicago winds.
Preparing the fabric: Before pre-shrinking the fabric, I trued the grain making sure the cross grain was perpendicular to the lengthwise grain. Then I folded the fabric in half and basted the parameter. I didn't want to go through the trouble of pre-shrinking it myself. So I sent it to the dry cleaners.
Pattern Alterations or any design changes you made: First I made a muslin to check the fit. Then I transferred the observed changes to the pattern. After posting the muslin photos, I noticed I hadn't sewn the correct seam allowance for the center back seam. Instead of the usual 5/8 inch allowance, the pattern called for about 2 inches seam allowance.
Would you sew it again? Would you recommend it to others? Not for myself. The collar is so unique that I wouldn't sew this version again for me. But I would recommend it to others. It's a fairly easy pattern to follow for a stylish coat.
Conclusion: I'm back to my original thoughts about this pattern. It's stylish and offers a unique collar to a otherwise standard design. It's a nice pattern to try. I wear my new coat on Christmas, everyone love it!
Here are all posting related to making this coat.

Sunday, December 21, 2008
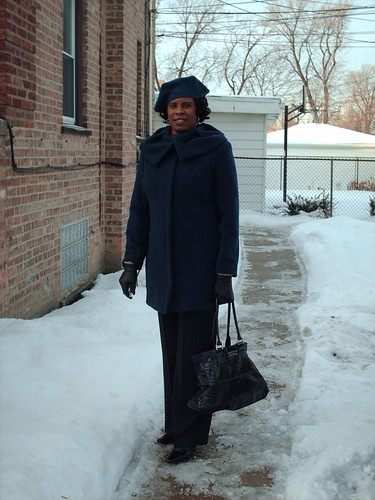
Ann's Cashmere Coat - Finished
I feel kind of like a loser girl. I have been enjoying reading everyone's posts, but I haven't done any posting on my progress. Mostly because, typical of any of my projects, nothing happens and then,wham! it's done in a flurry of activity and flying fabric bits. This coat is no exception. So I give you my finished "Michelle Obama Coat", Vogue 8548:
The shell fabric is a wonderful cashmere that I have had in my stash for a couple of years. I lined it with a brilliant painted silk charmeuse. It's one of those surprise linings that makes me smile and will probably cause comment when I take my coat off.
I posted all the construction details on my blog. The cashmere was tricky to work with. You need to treat it like a napped fabric, and use a gentle touch when pressing to avoid unwanted imprints.
I'm really happy with how it turned out. I was inspired by Erica B's version. This is a really great pattern and I'll be wearing it with pride for Christmas.
Happy sewing!


Saturday, December 20, 2008
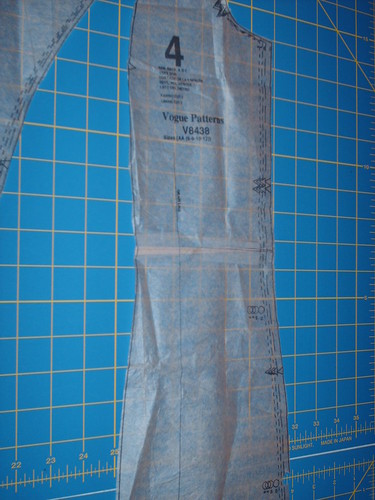
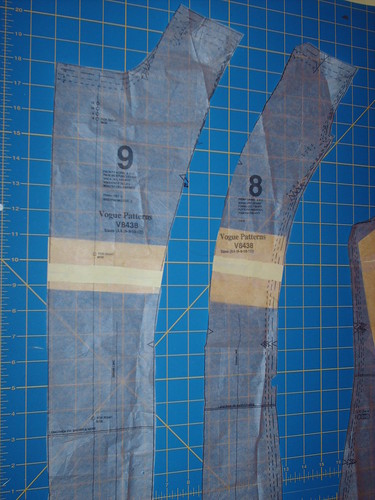
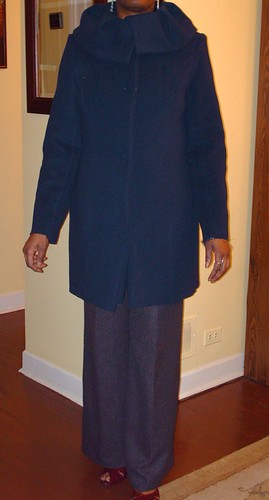
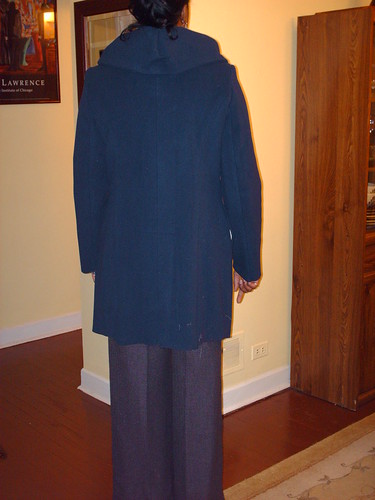
Alterations and Fitting Vogue 8438 - Part II
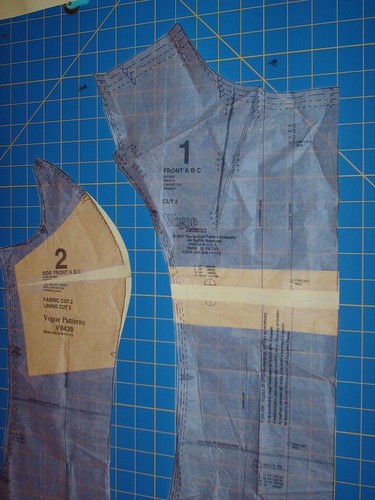
Finally, I'm able to post the alterations and fitting of my Sew-Along Coat, V8438. The pattern alterations were relatively easy. I had to make a FBA and a sway back adjustment. With princess seam style garment I usually don't worry about adding width across the shoulder blades in the paper pattern alteration. As I'm cutting out the garment I add a little more to the seam allowance just in case.
Here I made a sway back adjustment on the back and back lining pattern by folding out about 3/4 inch.
On the side back (also used for the lining), I gradually increase the amount to be removed as I moved toward the seam allowance that joins the back pattern.
On the front and front side pattern I made a FBA.
The adjustment were also made on the front facing and front lining.
Fitting - Front view - No gaping at the front closure across the bust line.
Back view - No horizontal lines across the back. The stitching at center back seam of the collar and the lower center pleat will be removed after the final press.
Side view.
I've already attached the front facing and lining.
Here's a view of the under collar. When I had the coat on the stand on the coat felt a little droopy. But I think I can live with it.
Tonight I plan to hem the coat and attached the lining to the sleeves.
Stay Tuned...,
Happy Sewing!
C


Monday, December 15, 2008
Ann's - Burda 7855 - "Complete"


 ..............................................................................................................................................................................
I used a decorative stitch on the lining hem and then sewed the lining to the coat by hand. (at the hems only!)
.....bound buttonholes and my buttons from The Button Drawer.

......single welt pockets


.........back vent detail. I didn't really notice the instructions for sewing the lining to the back vent - until I was actually sewing the lining to it. The pattern instructions for the vent would have you cover the vent opening, as illustrated in the picture. I didn't care for this, so I ended up modifying the flap lining. I clipped into the lining so I could then stitch the lining around the opening. I've done this before and so I'm pretty sure that the look I ended up with for this vent is not how it should end up looking like - however it's the best way I could think of to finish it, so the vent flap could freely open without being attached to the lining. It's also a shorter vent since I shortened the coat by 3 1/2 ".

I'm very very happy with this coat and I love the fit. I'm so pleased how it turned out and even more pleased with the fantastic information I gained from -
Paco's and Tany's tutorial - Thank you so very much to you both for sharing your time and valuable information!
Marji - Taking this project on was a huge undertaking and you did a fantastic job. Thank you.
It was a pleasure having so many people from all over the world come together for such a project. It was fun and I enjoyed seeing everyone's jackets come together.
More posts here!
Wednesday, December 10, 2008
Finished trapunto
I have changed my mind about this coat so many times. I finally decided to use some soft black wool twill from stash and put a celtic knotwork design down the centre in trapunto. Well, I have the trapunto stitched with batting and stuffed with acrylic yarn for some more depth. Now to cut out the coat!
It is a OOP Vogue pattern, #2449..jpg)
+(7).jpg)
Fortunately it is a timeless style and will still be wearable in years to come. However it won't match the scarf I knit in the summer.
Thursday, November 27, 2008
Dawn: Done!
Forgive the not-great photos. I have a cold and pink eye and my husband has don't-like-to-stand-outside-and-take-pictures-of-wife-itis.


Me as a flasher. Just had to show you the inside. :)
MaryPat's progress
Well, I am still here and still working on a coat. I have just finished a very busy period at work, which left no time for sewing or anything recreational except, apparently, eating. I tried on my muslin today, to find that is doesn't do up any longer. Fortunately for me, I began two coats. I guess I will continue on the looser one and focus on losing some of this extra weight so that what I have done doesn't go to waste.
Monday, November 24, 2008
Dawn: Making Headway
I've made a bit of progress on The Coat and I thought I would post a tip. I used those garage sale stickers to keep the right side and wrong side sorted out. This is dark purple melton wool and it's hard to decipher the right side. I figured the best offense was a good defense. I attached these stickers to the wrong sides of the fabric as I was cutting so I would always know which side was which. These stickers barely stick to regular garage sale things so I knew that them leaving behind residue was not going to be a problem. Before I fused on the interfacing, I removed them of course. That, and they amuse me. These stickers say Make An Offer. It's funny to "open" all the stacks and see what's inside. It's kind of like fortune cookies but, with these, you have to be much more reflective because most of them are prices.
I took several full length photos of the coat but they were all blurry, dark, and crappy. So I settled on two that turned out okay. This is the princess seam detailing with one of the belt loops and belt. When I take the real pictures it will have to be outside during the few daylight hours we have.
Is this lining great or what? This fabric is from Gorgeous Fabrics. 
Sunday, November 23, 2008
Tany's coat: finished!
Here’s the finished coat:
I was planning to take better pictures of me with the coat on, outside and with natural light but my family came to visit and all my plans have changed, so these are what I have for now (I’ll post better pictures as soon as I can). Photographing black velvet is very hard and the flashlight really changes the coat’s appearance; it looks like it has more reflexes; the coat is much more beautiful in real life and I feel really great wearing it!
You can see more pictures and read a full review at my blog (click here)
Thursday, November 20, 2008
Still Here, Still Working - Liana's Coat
Great idea for the roll call Marji! Thank you. I'm still plugging away on my coat, and although life has definitely gotten in the way, I will finish this.
To answer, yes, I'm back working on my coat, although it's been a harrowing process. I've been somehow unwilling to take the next steps with it, and I finally decided that it's because I don't like the extra I added to the front per Roberta Carr's instructions. After careful looking, pinning and checking of both the muslin and the actual coat in process, I've decided to cut off the extra and go with the original Marfy drafting. I don't know why I thought I should try to improve on them, they obviously know more than I do. Ann Rowley some time ago noted that this was NOT the way coats were done anywhere she's been. They always tape the edge and pull up on the tape if it wants to swing open. After my testing, I suspect that Marfy has already taken the whole issue into account somewhat anyway. So, as usual, I make work for myself that I don't need. Part of this epiphany came about after I pulled out my corduroy/suedecloth Marfy carcoat I made last year and thought about it as I wore it. It's about the same circumference or narrower than the cashmere, and seems to be fine, even though I whacked it off shorter than designed. I had forgotten how much I like it until I put it on again. I do wish I had done padstitching in the lapels, but I didn't really know enough I guess. I'm now wondering if I could do a little remedial stitching invisibly through the back of the lapels and get results. Any opinions, or even the voice of experience?
I also have been working on cutting the patch pockets and flaps, and realized quickly that I really can't match the pattern perfectly since there's a dart that ends below the top of the pocket. So, I'm going to match the front and lower edges of the pocket and match the flap to the pocket and call it good. As busy as the pattern is, I think that will be fine. I only get one chance with this since the repeat is large, and I have to have a pocket and flap that match on each side, and I don't believe there is enough fabric to do another set. I'm going to trace 2 copies each of the pocket and flap pieces so I can place them all before I cut.
So, work is progressing, although not as quickly as I could wish. I don't want to rush though, or try to do tricky things (like match and cut out the pockets) at less than optimum times, like late at night when I'm too tired to realize I'm too tired to do things right.
It's so wonderful seeing all the beautiful finished projects here. I hope we're going to be able to extend the life of this blog until most of us finish.
Jenny - I'm back.
It's so great to see some finished coats. They are giving me the inspiration to make the trek to the finish line with mine. In September, I found out I'm pregnant and quickly lost ALL desire to sew (morning sickness has that effect on me). Anyway, I'm almost done with the first trimester now, so I'll be getting back to that coat in the next week or so. I have to finish it in time to get some wear out of it while I can still button it!
Gry: Progress of a kind
Great to see the finished coats and thanks for the roll call.
In my last post I wrote that the coat would be done soon and that I only needed to
- Finish the collar
- Sew the lining
- Hem
- Sew snaps on
I have worked a lot on the collar. My main problem was to find the right interfacing; I wanted an interfacing that would add a little body to the collar without making it stiff and inflexible. I spent a lot of time visiting different shops and making tests. Els has helped me a lot, both by sending me a set of interfacing samples and by explaining how to make test swatches. I think the main lesson I learned in this process is that you should not be limited by what instructions are given with the interfacing. One of the interfacings I ended up preferring was really intended for silk and much, much lighter than anything suggested by the shop assistants I have asked. From now on, I will save left-overs of interfacing to make samples before I start on new projects.

After a long process I finally cut and made collar and found - alas! - it was too small. I had made the collar larger as Els had suggested in the comments to this post, but not enough. It has taken me very long to make up my mind about whether to cut it again or not since it is only a little too small, but I have decided to do it again. I used silk organza for this first collar which gave the right kind of body, but I think I will use a very light fusible interfacing for the second attempt.
I have made the lining, but have not attached it yet. I have bought snaps and did begin to sew them on, but wasn't quite satisfied with them. They are hard to open and I don't know if I will use them. I work as a volunteer in a second-hand shop and a couple of weeks ago I found a beautiful old coat with a very well-made hidden placket. It is sold by now, but I took pictures of the details (picture below). I am much inclined to try to make a hidden placket after all, now that I have seen how well it can be done in fabric similar to my own.

So this is where I am. I need to redo the collar and decide about the closing of the coat. I really hope to be finished soon - I am very tired of this project and I need that coat.
Wednesday, November 19, 2008
Vogue2884--almost there!
Of course, being the Person With No Camera, I have no pictures. Perhaps I will ask my daughter to come take photos over the upcoming holiday weekend.
I finished the wool/cashmere shell (cranberry) and have assembled the lining (a printed silk with hot pink roses and bronzy green leaves on a black background). I've decided I would like to add some thin hot pink piping where the facing and lining meet; it would, I believe, give a more finished look to the garment.
It took me a long time to make friends with fusibles and sergers, because I enjoyed handsewing and traditional methods. I did come 'round, and have enjoyed the speed and ease with which garments can be made (and I am aware that some newer fabrics simply behave better with newer methods). The journey back to traditional tailoring methods and materials has been the second best part of this process--the best is yet to come (actually wearing the coat!).
Tuesday, November 18, 2008
Still Here
Hi Marji, yes the shout out was a good idea. I've let my coat slide a bit as well, but it's still going. I got sandbagged with work for the last several months, and have reverted to smaller projects and some knitting which is more portable. The coat is semi-constructed, lining cut out, and all stacked on a chair in my sewing room. Last weekend I finally holed up in the sewing room, but decided I needed some winter pants so took apart an old pair I loved (and wore out) and made a new pants pattern instead. I'll wear a new pair today. Since it's 25 degrees outside, and we have snow on the ground this morning, the coat is more appealing. I don't know when I'll get to it, the yarn came yesterday for my SWAP cardigan and I'm itching to get started on that.
I love looking at the completed coats, and hope to have mine on my blog within the month. Football weekends (at least the kind I travel for) are nearly over, work is getting under control, and the weather has made any idea of outdoor stuff unappealing, so I'll get cracking. K
Monday, November 17, 2008
Ann's Progress
Hi Marji,
Great idea to roll call :)I have been working on Burda 7855 and I have made great progress with my coat.I have the coat and lining done, but not sewn together yet!
From the start I had trouble finding just the right buttons, and just last week, did find what I hope to be the perfect ones. I'm still waiting for them to arrive from The Button Drawer. When they do arrive I will just have to make my bound button holes (a bit out of sequence but still ok) /sew the lining in/ buttons/ hems......take pictures....
Congratulations to those who have finished their coats. They all look wonderful and are all very impressive!
WindPro as sew-in interfacing?
One of the advantages of having made the little Burda coat recently is that it allowed me the wearing experience of an interlined garment. I think I'd have preferred it if the interlining was attached to the coat itself rather than the lining. Since my big coat's interlining is a very stable fleece, Windpro from Malden Mills, I'm wondering if that wouldn't suffice, if pad stitched to the fashion fabric, as interfacing support? I realize this sounds a little unconventional - would any of you like to weigh in and help me think this through? Thanks so much!
Michelle L. Stalled for a Long Time, but Forging Ahead Now
I am working on the now-out-of-print Vogue 7988 for my fiance.
For a long time, I was completely afraid to cut into my fabric, because I felt completely overwhelmed and like I didn't know what I was doing.
I also spent a long time reading through some more books and internet resources on men's tailoring. But the best thing I did was I bought a men's coat from the goodwill and completely dismantled it so I could see how it was put together.
After that I was ready to cut into the fabric, and I am in the process of doing all the padstitching.
I also had to purchase a buttonholer for my sewing machine. I tried on scraps of fabric to make the buttonholes by hand, but I am a dismal failure at handmade buttonholes. I can make them on the machine, but I sew on a Singer 401 and 603, so no computerized buttonholes, I had to wait for Ebay to come through for me. Fortunately, it didn't take long.
There is a template for keyhole buttonholes, and I am sure it does a much better job than my shaky fingers do.
Now that I am "forging ahead" I will have some photos of coat progress soon.

Tany's coat: setting in the lining sleeves
Well, these are the last images before showing you the finished coat; at this point I still have to finish hand sewing the lining to the facings, sew the french tacks to the hem and stitch the buttons in place (besides cleaning the lint out of the coat!)
The lining was applied following the instructions in the Reader’s Digest “Complete Guide to Sewing” book so you may need to refer to that book to see additional details and diagrams of the process (I own both the vintage 70’s edition and the newer one and both books explain the process in great detail).
The tailored lining is constructed separately (the sleeves are constructed but not set at this point), leaving the shoulder seams open, and it’s entirely hand sewn to the coat; besides slipstitching the lining to the facings, the lining’s side seam allowances are also tacked to the coat’s side SAs using short running stitches (these stitches should not be visible on the right side of the coat; the needle catches only the SAs). I started by performing this operation on the side seams and then I hand basted the lining to the facings, neckline and shoulders. The lining should also be attached around the armholes using short running stitches on the SAs side. The body of the lining becomes attached and well secured this way. Only at this point we are ready to set in the lining sleeves and that’s what I’ll be illustrating next.
As we did for the coat side seams, the lining and coat back sleeve seams should also be tacked together. To do this the sleeve and the lining sleeve should be wrong side out with the back seams facing each other. The two SAs are basted together by short running stitches, ending 10cm from the sleeve cuff edge:
To turn the lining sleeve over the coat sleeve, I must insert my arm through the lining sleeve and hold to the coat’s cuff, passing the lining through the arm over to the coat’s sleeve:

Before stitching the lining sleeve to the lining, here’s how the armhole looks with the shoulder pad and the “moustache” sleeve already set in place:
Here’s a better view of the shoulder pad before attaching the lining to the facing and shoulder:
The sleeve SAs are turned in (the sleeve cap should be eased and the bottom armhole stay stitched and clipped) and slipstitched using a double strand of thread on the needle for reinforcement:
Now I have to slip stitch the lining to the facings, shoulder and neckline and sleeve hem, remove the bastings, hem the lining, make the French tacks and sew the buttons in place. I will try to get the coat finished by tomorrow. See you soon!