
I am getting a little stressed about my coat. It is past mid-June and I am not ready to cut the fabric yet. I have bought the fabric and prepared it. I have been to the library and have found out how to do the hidden buttons thing. I have worked with my pattern, and, I think, improved it. But I am not ready yet. The thing is that I don't know what collar to put on the coat. Until I know this, I cannot finish my pattern and get started on the coat.
When I first made the muslin, I thought I would leave the coat collarless, but I have changed my mind. I think the A-line coat needs a collar to balance it. The question of the collar is no easy matter. I have made coat-sketches since last Christmas without coming to a conclusion. I decided I would try out some different collars on the muslin. A secondary motive for doing this was to get some experience in drawing collars. So far, I have sewn 4 collars and drawn a couple more. Here are the two first.
Collar 1: Mandarin collar A very classic collar, it makes the coat look like something from one of my vintage books. Perhaps, it is a little too classic for me? Besides, I don't think that the collar is big enough for the coat (I know, it is impossible to judge this from the picture).
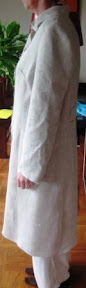
Collar 2: Peter Pan collar This collar is very sweet, but not quite what I am looking for. The collar might work better if it was bigger.
I will add more collars and full-figure pictures on my blog.
Saturday, July 19, 2008
Gry's Collars
Sigrid's muslins
Earlier today I posted my new muslins on my own blog, as I knew I was too late for the timeframe here. Just read Marji's post that it's still OK to publish muslin pictures, so here are mine. Finally decided on a fairly classic coat with notched collar, sleeve vents and longer than my first muslin. (if you're interested in how to sew a sleeve vent, I've added a tutorial on my blog, and plan to publish another method this week).
Els was so kind to help me decide on the interfacing, as the fabric is a bit too loosely woven for a coat fabric. Both Melissa and Els sent me samples for the interlining, as also an extra layer for warmth is needed. Thank you both for your help.
I've decided on BWOF 11-2006-108 (without the cuffs, but in a version with sleeve vents). In the end I feel more comfortable with a collar style like this.
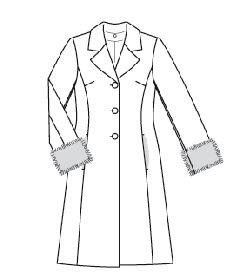
I made a partal muslin for the BWOF 12-2006-120 too, both muslins in size 44, but in the last one (shown on the left) I added quite a lot of space at hip height. As you can see from the other muslin, I need that.
| 11-2006-108 | 12-2006-120 | |
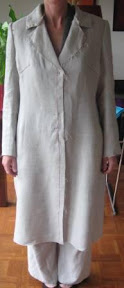 |  | The upper part of the coat with notch collar is (a bit) too wide. The other too snug. I wear the same winter jacket under each muslin. I'm unsure how this space will be filled by a more substantial fabric, combined with interlining. |
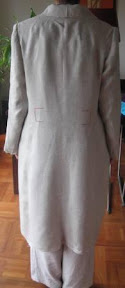 |  | Same story in the back, back of sleeve is a bit too much space perhaps. |
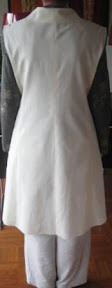
 | The side view of the coat I've decided that will be my pattern. Should I use 42 or even 40 for the upper part? Or would I need the space for fabric, interlining and lining? I appreciate your comments on this. | |
Friday, July 18, 2008


Marji: Fabric Prep and Fusible Underlinings
Fabric Prep, for those who're using a fusible underlining:
If you're going to be using a fusible to underline your coat my suggestion is to block fuse the fabric BEFORE laying out and cutting. If you're lucky enough to be LindsayT you can have it done for peanuts professionally in NYC. (insert little "green with envy" icon here) The rest of you will want to *do a preliminary layout, then cut the fabric in "blocks" around the pieces. This is extremely important. Can you imagine arbitrarily cutting sections and then not having enough length to cut a section of your coat?
• Note that if you cut a section that no longer has any selvage edge attached you want to thread trace your grainline on that piece before cutting your block. Use silk thread or rayon embroidery thread so that the thread lines don't create a permanent ridge in your fabric while fusing.
• Make very certain that your grainlines are lined up—fusible and fashion fabric—and that your warp and weft yarns in your fashion fabric are perpendicular to each other. On Each Piece, before you fuse.
• Note that this does not apply to anyone using fusibles for interfacing for shaping the lapels—that is an entirely different process. This just applies to those using fusibles to underline their entire fabric.
Marji - is back in the building
ClaireS - THANK YOU ! - Edited
Edit ...
Marji - No, I didn't quite understand the 'cut 2 sizes smaller neckline' but will give it a go once I get home...It will probably make more sense once it's all sitting in front of me. I should try this before I attach the collar ? I would need the collar 2 sizes smaller as well, I would think. I did look at Tany's pic and have a good idea what I'm shooting for.
Linda - I haven't taken ANY comments with a grain of salt, but I have tried to incorporate (or at least understand) all of them. Anyone who is willing to help me is worth their weight in gold ! This info will help me later too, it's all a learning curve.
Last night after the latest attempt to fit the sleeves, self confidence was at an all-time low thinking this project is just too much for my skills at this stage of the game.
This morning, in the light of day (well, it was pouring rain w/thunder & lightning, but you get the picture) and with some encouraging comments (including those from a wonderful DH), I’m ready to tackle it again. So, thank you everyone.
Marji - I will try the narrow shoulder adj. I ‘finally’ figured out exactly which bone on my shoulder I should be measuring from - it’s only about 4.5" from where my necklace sits - is that short ? The shoulder line on my jacket is a full inch longer than that. I'll go back to Rosemary's post & ELS sleeve adj and make the most use of DH while he is still willing to help - this coat may wear him out at some point.
Linda - Yes, I did move the shoulder seam forward (1/4" at neckline, 1/2" at shoulder point). I moved the notch forward, but then there was too much bunching of the sleeve in front and not enough at the back, it pulled something fierce. So I ended up tilting the sleeve back instead - of course, we see how well THAT turned out :-)
My muslin is getting pretty crowded with original markings, adjustment lines and new seams.
While I am perfectly willing to do this, would it be worth my while to transfer the adjustments (the ones that have worked so far, waistline, vertical seams, low bust adj) on my tissue pattern and make a new, clean muslin - OR - just keep going on this one ?
Thursday, July 17, 2008
Claire S. - V8346, still working on sleeves
I'm hoping I'm not the only one still having trouble with the muslin - I know we're supposed to be cutting real fabric by now.


Mary OK's second muslin updated


Edited to correct Burda style number
Here is my second muslin. I added pleats to Burda 11/2006 # 129 to copy Marfy F1022. There was no change to the fronts or the sleeves, but I think the shoulder pad may not be straight on the right shoulder. I added the collar and turned under the seam allowances on the front, collar, and lapel. I love the scale of the collar and lapel. I'm a little concerned about the ripples across the back. Any thoughts?


I am not sure about the wide cuffs as in the Marfy model, but am considering instead a vertical tab as in Burda 9/2006 style 101, below. I think I would turn them the other way, so the rounded edge is toward the back. I would love some feedback about that choice!
Edited to respond to Liana's comment:
Liana noticed the waist on the Marfy is raised. Suppose I start the pleats here:
I guess I didn't do that to start with because I was afraid it would look like a sack. Right now, the front is very roomy. I think I would have to fit the front better to make the higher waist look less sack-like. Thank you, Liana!
In other comments, MaryJ and Nancy K noticed that the side seam tilts forward and the front hem tilts up. So I made these changes:
- added 3/8" at center front, tapering to nothing at side seam
- took in 1/8" to 1/4" on the side front seams from just below bust to hip
- started the pleats higher, actually about 1" below the bust line.


I like the change in the front, but the back, not so much. I'm not feelin' it. Maybe the muslin is tired . . . I am surprise at how differently the back hangs when the pleats break higher up. It looks like I've lost that nice a-line shape that attracted me to the Marfy design.
I have printed out the chapter on drafting skirts, from VintageSewing.info (http://vintagesewing.info/1940s/42-mpd/mpd-08.html), and will read it tonight.
Late Muslin
I really tried to make the 7/15 deadline but a family emergency got in the way (a sick grandchild). I know I'm only on my first (presentable) muslin, but I sure would appreciate any suggestions. That would help as I am determined to catch up. Pictures are posted on my blogspot www.rosessewingroom.blogspot.com Thanks!
Monday, July 14, 2008
Laura's Second Muslin
I incorporated Marji's suggestions (sort of) and ripped the shoulder and side seams out. I did not recut the muslin, but raised the the shoulder SA by 1" at the outer edge, leaving it at 5/8" in the neck. I took in the side seams by 1". I also tightened the front and back princess seams a hair or two. Did I screw up by doing these shortcuts or is it looking better?


I do believe I'll also turn that back vent into a box pleat. Critiques and suggestions welcome.
Sunday, July 13, 2008
Heidi's Muslin - V7979
I finally completed my muslin! I was going to use Burda 8171, but I decided to go with this pattern because it had a center back seam. I just went to a Peggy Sagers seminar at the ASG conference and she had everyone repeat, "Center back seams are your friend." She said they would be my friend in particular because of my broad, curved shoulders. I'd like to introduce you to Vogue 7979, my new friend!
I tried the muslin on over a shirt and softly tailored jacket. Overall it was pretty comfortable, which surprised me. I felt I could move around comfortably. The pattern seems pretty well drafted. (I made a mistake on the side back piece - I cut it too short! Oops!) It has inseam pockets, as you can see in the front view below. How does the front and back look to you? It looked pretty good to me.


Next are the right and left side shots. The collar looks really bad here, but I think it's simply the choppy sewing I did (I didn't insert the band on the upper collar piece) and the stiff fabric. I inserted the sleeves pretty poorly, too, so you can see puckers. This fabric didn't ease very well. I inserted my shoulder pads so they were about 1/2" into the sleeve. This is what I was supposed to do, right? Overall I think the shoulder seam is fine both visually and comfort-wise.


Next is a closer view of the upper back with me hugging myself. Again, the collar is a little shabby and it is hard to tell how it will look in wool, since I used a stiffer cotton "muslin" for this trial.

All in all, it looks pretty good for my very first coat muslin. My conclusion is that I think I need to let it out a little in the upper back, upper chest, and waist. I also need to let it out a little in the hips, too. I think I will also shorten it a bit so it's closer to knee-length. After doing this, I might need to do a sway back adjustment, as the back view above seems to have some extra fabric in the lower back area.
Your honest feedback, please!
ETA 7/22/08: Anyone have any comments for this advanced beginner who's never made a jacket or coat? I could use all the help I can get before I start making the adjustments to my muslin!
Edit by Marji right on your post to keep the information together.
 1. I think your muslin body looks Great!
Understand that making a muslin is a process to deal with the overall fitting issues. It's the place that you want to discover that you should have made the alterations that require changing the shape of the pattern pieces that can't be done once your fabric is cut. Things that require adding pattern tissue or slashing and darting tissue; like sway back adjustments and forward shoulder adj and many other alterations folks have been making here. The muslin is Not your final fitting garment.
In this case, it looks good, and you've said you feel you have enough room to move, I don't think you need to work any more on the body. I would suggest cutting 1" seam allowances on your vertical seams so that you can let it out if it feels snug - and maybe even 1.5" seam allowances through the tighter areas. Understanding that you're going to cut off the excess after your first fitting in the coat fabric.
2. The only place I have a little bit of concern is with the sleeve. I downloaded your pics and made a composite of the areas of concern and drew dk pink lines that evidently aren't going to show up here unless you click on and enlarge the photo.
It's not that a garment shouldn't ever have a wrinkle or a line, but it shouldn't have pull lines or creases where there is excess fabric. These lines on your sleeve indicate to me that the sleeve isn't fitting well.
I have a question before I make any recommendation on what to do with the sleeve - Is your shoulder seam sitting directly on top of your shoulder? I forget whose neck it is that I drew on showing what the correct shoulder placement should be, but if you scroll back a bit you should find it.
Starting from behind your ear, draw an imaginary line down to your neck. That is where your shoulder seam should originate, and it should terminate at the bone at the end of your arm. If your shoulder seam is sitting too far back (and the Big 4 are notorious for drafting patterns with shoulders aft), then that may be affecting how the sleeve is hanging, and that should be fixed first. If you shoulder seam is in the right place, then let me know, and I'll do a bit of looking at references to figure out what to recommend.
This is a case of where, if you were right in front of me, I'd take out the sleeve stitching, and rotate the sleeve a bit, pin it in, take a look, adjust a bit and keep tweaking until I got it good, then draw my new match lines and be on my way.
All in all, your muslin fits very well. The little bit of sleeve alteration your going to need to make is just the difference between a good fit and a great custom fit.
Digs McCall's 5247 wearable muslin, aka Enchanting Edinburgh


Last weekend, with an incipient summer cold simmering inside me, I decided I need a quick warm cover up for when the AC turns the office into an arctic wasteland. What better than to try the tweaked coat pattern, I thought? Tweaks included moving the front & back side seams 1" toward centre, raising the waistline 1", lengthening skirt by 5 cm, dropping the back neckline down 1 cm & adjusting collar length a bit for it, dropping the front 1 cm, giving the sleeves a bias cut cuff that extended well inside the sleeve so I can wear the sleeve turned down or up to show off a bracelet, cutting the first 4 cm of the pockets as one with the relevant pattern piece, and then making both sides of the pocket out of lining fabric underlined with cotton sheeting to make it wear-tough.
I used a wool twill (Scott Black & White tartan) that I'd bought in Edinburgh last fall, and lined it with a silk jacquard print of green shamrocks on a black background, from Fabric Mart.
Note to self: do NOT pick a plaid if the objective is a quick to finish project. I ended up having to baste every seam so the plaid pattern stayed put across seamlines. This included ripping out a few originally pinned seams, yes even with a walking foot, and at least doubled the time I spent on it.
Other lessons learned: The size I muslined is too large: the skirt's voluminous, which is OK, but the shoulders are also too wide, which is not. Here's where photos of one's project are really invaluable: after seeing them, I narrowed the shoulder princess seams by 1 cm front & back, and took in the waistline by 3.5". I also went back and interfaced the vent edges and the hem for a crisper look. And I tacked the facings to the fronts with invisible prick stitching.
All in all, although still on the roomy side, this has turned out to be a perfectly wearable light cover-up.
Tany’s muslin: Notes on the sleeve alteration and the fit of the neckline
Depending on the fabric and the style intended for the sleeve (and your personal preference), sometimes there's the need to reduce the sleeve cap ease so the sleeve fits better on the armhole. This is not a difficult alteration but I always check the following list first:
- the armhole is correctly designed and there isn’t the need of changing the shoulder seam (this is an important requisite to start with);
- The neckline fits according to the expected
- All the alterations/adjustments needed on the front and back of the coat were already made
- The sleeve, as is originally, hangs correctly from the shoulder and leans slightly to the front, following the natural posture of the arm
- The arm movement is not restrained by the sleeve and there is enough ease along the sleeve to accommodate the arm comfortably
- All there is potentially wrong is the extra ease causing puckers on the sleeve cap (and I say “potentially” because it depends on the fabric you’re using; if you are using wool, on most cases the extra ease can be shrunk to fit the armhole), and/or there’s a little excess fabric on the front or on the back of the sleeve cap (this is easy to correct just by deepening the curve on the referred side of the sleeve cap, removing the excess fabric - again, this is a slight adjustment!).
To evaluate the extent of the cap ease to be removed, I often measure the armhole and the sleeve cap, but just by observing the original sleeve one can have the perception of how much ease needs to go away. I don’t like to exaggerate; this must be a small adjustment and always tested on muslin first, as I did for my coat (if you take off too much ease, the sleeve will rise to the side or will pull the shoulder down!). Here I wanted to take off 2cm of ease and narrow the front cap of the sleeve, because I could see there was too much fabric there. So I took off 1cm of the cap height (making a 5mm deep fold) above the easing notches, and this is how it’s done on paper:
Folded and taped in place:
Trueing the front cap curve, taking a little width off:

Trueing the back cap curve:
The fit of the neckline:
Els brought to my attention that the neckline was a little loose on the first picture of me with the muslin on (front view). I had noticed this before but thought it was due to the not pressed wide SAs inside the collar, but listening to Els advice I went and checked it again. Els advised me to measure the neckline on the pattern and the muslin to see if there has been some stretch due to the neckline not being stabilized. She also suggested that I could compare the pattern with a known pattern from BWOF, for example. When comparing the neckline measure of the muslin with the paper pattern I found out that there was a stretch of less of 1cm, but still this influences the fit of the neckline/collar (this enhances the importance of stabilizing these seams when tailoring; it does make a difference!). When comparing this pattern with a BWOF coat pattern, I also found out that the shoulders of the Patrones have more slope, hence I tried a smaller shoulder pad (with less height) and this was the result (btw, just remembering that this is a mirror image so the sleeve on the left of the picture is the one with the alterations; also, I'm wearing a T-shirt under the muslin here, so it may look a little hollow on me):
I and Els both agreed that there is no need to alter the collar, since it looks almost perfect now. From this example we can all see how little details like the correct shoulder pad or the stabilizing of the neck seam have a great influence on the overall fit of a garment. Thank you Els for taking the time to help me out with this!