I'm hoping I'm not the only one still having trouble with the muslin - I know we're supposed to be cutting real fabric by now.

I'm hoping I'm not the only one still having trouble with the muslin - I know we're supposed to be cutting real fabric by now.


Edited to correct Burda style number
Here is my second muslin. I added pleats to Burda 11/2006 # 129 to copy Marfy F1022. There was no change to the fronts or the sleeves, but I think the shoulder pad may not be straight on the right shoulder. I added the collar and turned under the seam allowances on the front, collar, and lapel. I love the scale of the collar and lapel. I'm a little concerned about the ripples across the back. Any thoughts?


I am not sure about the wide cuffs as in the Marfy model, but am considering instead a vertical tab as in Burda 9/2006 style 101, below. I think I would turn them the other way, so the rounded edge is toward the back. I would love some feedback about that choice!
Edited to respond to Liana's comment:
Liana noticed the waist on the Marfy is raised. Suppose I start the pleats here:
I guess I didn't do that to start with because I was afraid it would look like a sack. Right now, the front is very roomy. I think I would have to fit the front better to make the higher waist look less sack-like.
Thank you, Liana!
In other comments, MaryJ and Nancy K noticed that the side seam tilts forward and the front hem tilts up. So I made these changes:


I really tried to make the 7/15 deadline but a family emergency got in the way (a sick grandchild). I know I'm only on my first (presentable) muslin, but I sure would appreciate any suggestions. That would help as I am determined to catch up. Pictures are posted on my blogspot www.rosessewingroom.blogspot.com Thanks!
I incorporated Marji's suggestions (sort of) and ripped the shoulder and side seams out. I did not recut the muslin, but raised the the shoulder SA by 1" at the outer edge, leaving it at 5/8" in the neck. I took in the side seams by 1". I also tightened the front and back princess seams a hair or two. Did I screw up by doing these shortcuts or is it looking better?
I do believe I'll also turn that back vent into a box pleat. Critiques and suggestions welcome.
I finally completed my muslin! I was going to use Burda 8171, but I decided to go with this pattern because it had a center back seam. I just went to a Peggy Sagers seminar at the ASG conference and she had everyone repeat, "Center back seams are your friend." She said they would be my friend in particular because of my broad, curved shoulders. I'd like to introduce you to Vogue 7979, my new friend!
I tried the muslin on over a shirt and softly tailored jacket. Overall it was pretty comfortable, which surprised me. I felt I could move around comfortably. The pattern seems pretty well drafted. (I made a mistake on the side back piece - I cut it too short! Oops!) It has inseam pockets, as you can see in the front view below. How does the front and back look to you? It looked pretty good to me.
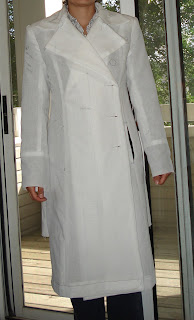
1. I think your muslin body looks Great!


Last weekend, with an incipient summer cold simmering inside me, I decided I need a quick warm cover up for when the AC turns the office into an arctic wasteland. What better than to try the tweaked coat pattern, I thought? Tweaks included moving the front & back side seams 1" toward centre, raising the waistline 1", lengthening skirt by 5 cm, dropping the back neckline down 1 cm & adjusting collar length a bit for it, dropping the front 1 cm, giving the sleeves a bias cut cuff that extended well inside the sleeve so I can wear the sleeve turned down or up to show off a bracelet, cutting the first 4 cm of the pockets as one with the relevant pattern piece, and then making both sides of the pocket out of lining fabric underlined with cotton sheeting to make it wear-tough.
I used a wool twill (Scott Black & White tartan) that I'd bought in Edinburgh last fall, and lined it with a silk jacquard print of green shamrocks on a black background, from Fabric Mart.
Note to self: do NOT pick a plaid if the objective is a quick to finish project. I ended up having to baste every seam so the plaid pattern stayed put across seamlines. This included ripping out a few originally pinned seams, yes even with a walking foot, and at least doubled the time I spent on it.
Other lessons learned: The size I muslined is too large: the skirt's voluminous, which is OK, but the shoulders are also too wide, which is not. Here's where photos of one's project are really invaluable: after seeing them, I narrowed the shoulder princess seams by 1 cm front & back, and took in the waistline by 3.5". I also went back and interfaced the vent edges and the hem for a crisper look. And I tacked the facings to the fronts with invisible prick stitching.
All in all, although still on the roomy side, this has turned out to be a perfectly wearable light cover-up.
Depending on the fabric and the style intended for the sleeve (and your personal preference), sometimes there's the need to reduce the sleeve cap ease so the sleeve fits better on the armhole. This is not a difficult alteration but I always check the following list first:
- the armhole is correctly designed and there isn’t the need of changing the shoulder seam (this is an important requisite to start with);
- The neckline fits according to the expected
- All the alterations/adjustments needed on the front and back of the coat were already made
- The sleeve, as is originally, hangs correctly from the shoulder and leans slightly to the front, following the natural posture of the arm
- The arm movement is not restrained by the sleeve and there is enough ease along the sleeve to accommodate the arm comfortably
- All there is potentially wrong is the extra ease causing puckers on the sleeve cap (and I say “potentially” because it depends on the fabric you’re using; if you are using wool, on most cases the extra ease can be shrunk to fit the armhole), and/or there’s a little excess fabric on the front or on the back of the sleeve cap (this is easy to correct just by deepening the curve on the referred side of the sleeve cap, removing the excess fabric - again, this is a slight adjustment!).
To evaluate the extent of the cap ease to be removed, I often measure the armhole and the sleeve cap, but just by observing the original sleeve one can have the perception of how much ease needs to go away. I don’t like to exaggerate; this must be a small adjustment and always tested on muslin first, as I did for my coat (if you take off too much ease, the sleeve will rise to the side or will pull the shoulder down!). Here I wanted to take off 2cm of ease and narrow the front cap of the sleeve, because I could see there was too much fabric there. So I took off 1cm of the cap height (making a 5mm deep fold) above the easing notches, and this is how it’s done on paper:
Folded and taped in place:
Trueing the front cap curve, taking a little width off:

Trueing the back cap curve:
The fit of the neckline:
Els brought to my attention that the neckline was a little loose on the first picture of me with the muslin on (front view). I had noticed this before but thought it was due to the not pressed wide SAs inside the collar, but listening to Els advice I went and checked it again. Els advised me to measure the neckline on the pattern and the muslin to see if there has been some stretch due to the neckline not being stabilized. She also suggested that I could compare the pattern with a known pattern from BWOF, for example. When comparing the neckline measure of the muslin with the paper pattern I found out that there was a stretch of less of 1cm, but still this influences the fit of the neckline/collar (this enhances the importance of stabilizing these seams when tailoring; it does make a difference!). When comparing this pattern with a BWOF coat pattern, I also found out that the shoulders of the Patrones have more slope, hence I tried a smaller shoulder pad (with less height) and this was the result (btw, just remembering that this is a mirror image so the sleeve on the left of the picture is the one with the alterations; also, I'm wearing a T-shirt under the muslin here, so it may look a little hollow on me):
I and Els both agreed that there is no need to alter the collar, since it looks almost perfect now. From this example we can all see how little details like the correct shoulder pad or the stabilizing of the neck seam have a great influence on the overall fit of a garment. Thank you Els for taking the time to help me out with this!


Edit - July 11 - I'm still stuck.
The actual problem - Neither sleeve feels tight around my arm, only pulling at the underarm.
Gry - suggested to change the sleeve balance and rotate the sleeves to the back
EJVC (ClassicalReader) - understood that I added the width on the left sleeve to the under part of the sleeve and suggested that I split the sleeve both horizontally and vertically on the upper sleeve to get added width.
1) I didn't specify clearly - I did add the 1-1/2" width to the upper sleeve...just that the amount was 1-1/2" at the level of the underarm (sorry, don't remember what the name of that part of the sleeve is called), more at the top of the sleeve cap and tapering to nothing at the cuff. you can see a loooong 'V' of stitching on the pic showing my full left side.
2) EJVC's solution will add depth to the armhole - I think it is already too low since, when I lift my arms, the pull is right at the armpit. It seems as though you have one thing or the other, either the armhole is high enough to move your arm or it's big enough to wear a heavy sweater, but not both. Is there a happy medium?
3) I think rotating the sleeves back will take away the vertical wrinkles but will that loosen up the pull when I lift my arms ?
4) To rotate the sleeves, do I take them completely out and reset them ? or leave the bottom in place and shift the upper part of the sleeve cap to the rear.
Thanks for the comments so far...this part seems so much more complicated than the body was.
original post - Jul 4
******************
Let's start with the positive, shall we ? After all the suggestions on my first muslin, and Marji's pics to show exactly how to fix some of 'em - THANKS Marji & everyone - I managed to,
1) raise the back neck 1-1/4";
2) let out the side seams and the front & back princess seams 1/4", to get an added waist measurement of 3";
3) lower bust point 1-1/4"
4) raise the front waist 1" at CF , raise the waistline at the sides 1-1/2", and the back waist 1-1/2" - I have no idea if this is the proper way to make the waist level or not.
I didn't change the angle of the shoulder seams because I thought there is room for the shoulder pads.
Also did not move the shoulder seams forward, I think they're in the right place now.
Please let me know if the shoulder seams do need adjusting after all.
This felt pretty good, til I attempted the sleeves ! - maybe I should make a vest ?
Now- I am about to prove exactly how much of a newbie I am at this - feel free to let me know just how badly I messed up these sleeves, 'cos for sure they're not right.
V8346 has a one piece sleeve - the only 2-pc sleeve pattern I have is a McCalls (M5247), yup a different brand so I was prepared for it not to work.
I traced out the McCalls sleeve, size 16, measured the seamline against the seamline of the V8346 sleeve - both the same measurement - different shapes though.
I measured the actual armhole of the muslin, it is the same as the Vogue sleeve measurement - unless I made a drastic mistake somewhere, there is NO ease in this sleeve cap. Since my McCalls measurement was the same, there is no ease in this one either.
The McCalls sleeve without any changes, is my right sleeve. It is pretty tight, I can't lift my arm up very much.
I read everything I could find about fitting sleeves - sleeve cap ease, making bicep larger, changing armsyce depth - but since I didn't know exactly what the problem was, I winged it.
I split the left sleeve down from the top of the sleeve to the hem and spread it to add 1-1/2" right where the underarm is...which, by the way, seems really low except you do need room for sweaters, right...it can't be too high up, no ? And I'm going to need room for all the layers of the real material once I get to that point. It's still too tight to raise my arm, but now the sleeve looks bulky.
So, here are the pictures
Before Sleeves - first one shows the final tweak of the waistline and was taken after the other 3.
After Sleeves - I rec'd Marji's package in the mail today, so the shoulder pads are sitting in place.
Right sleeve - McCalls 5247 no adjustments.
Left sleeve - McCalls 5247, split vertically and added 1-1/2" at underarm level
This is as much as I can raise my arms - how's that for a pose ?
I see wrinkles/pulls that I think mean things are too tight (at the back & the bust), but the only things that actually feel tight are the sleeves.
Sorry, I just saw how long this post is but I don't know what to do next and am really stuck.
I wasn't sure if I should start a new post on this but I have several questions about what I should do with my fabric. As you know, it's 100% cashmere. I've read all the pertinent info you have posted on fabric, luxury fabrics, underlining, fabric prep, etc., and I still have questions.
1. I was planning to have it pre-shrunk at the cleaner's. I was thinking of just having them steam press it rather than clean it, although they are a CO2 cleaner which might be gentler anyway. But, all the texts mention rather strongly that steam can damage cashmere. What do you suggest? I'm not one who routinely sends clothing to the dry cleaners. I brush, air and shake them, and only if there's actual dirt would I send this to the cleaners. So I'm a little worried about taking my gorgeous fabric to them now to see if it will come back unharmed. Am I worried about nothing here?
2. It's extremely soft and drapey, and definitely needs underlining. I have tried lots of fabrics with it using your over-the-arm test and also holding both fabrics together and holding them up to myself in front of a mirror, and silk broadcloth and silk organza (which I happened to have on hand) seem to be way too lightweight. The cashmere is soft enough that if I drape it over my hand, I can see my knuckles, etc. right through it. This continues to be the case with organza and broadcloth, although 2 layers of broadcloth will soften the knuckle-effect a bit. I don't have enough silk broadcloth to do a double layer, and I think a double layer of anything is just asking for trouble anyway. I tried Pam's non-fusible interfacing under it, and I think that's what I am leaning toward. It gives it a tiny bit of body, yet it still falls in beautiful folds. Do you think I will be okay with this plan, or do you have any other ideas? This fabric is so soft by itself and I don't want this coat to look like a limp rag, or to show outlines of the shoulderpads, etc. I don't think I want flannel, as I don't believe I need the extra warmth. I'm planning on lining with silk charmeuse.
Just wanted to give a short post about my progress and why there has been no muslin from me as yet. Well, I have been transforming and reworking and altering and puzzling over my pattern so as to make something like a copy of the Pringle coat I posted some time ago - double breasted, raglan sleeves, with a waist seam, princess seams on the front, a back box pleat on the skirt, not to mention concealed buttons, self trim, and huge statement pockets.
I have completed many of the alterations to the pattern, based on BWOF 10/07. First, I traced the pattern. It's an ankle-length coat and I wanted thigh-length, so I shortened at the hem by 38 cm. Then I marked the waistlines and cut apart the bodice and skirt of the coat. Then I got out the size 10 vintage Valentino pattern Marji spotted for me earlier, matched up the existing two piece sleeve for the BWOF pattern, compared it, and traced the Valentino raglan sleeve, extending the sides because of my larger arms (I wear a pattern size 16). I didn't lengthen the arms because I normally have to shorten them so size 10 length may be good for me. I then traced off the matching raglan shoulder seams on the back and front bodices with the valentino as a reference. Then I had to alter the traced raglan sleeve to account for the different collar on the BWOF pattern, which was difficult as the Valentino is single-breasted and the collar comes to the centre, whereas the BWOF is double-breasted and there is a straight panel across the front. Ack. Mind bending to transfer to the raglan sleeve, but I *think* I've done it. Then I altered the back skirt to add the pleat.
Areas I still haven't faced: should I cut the front facing all in one piece rather than dividing it at the waist? How will the lining pattern be affected - should I divide it at the waist as well (I think so, but maybe it would be better not to...)? Should I cut the back with it's CB pleat on a fold or in two? The raglan sleeves from the Valentino are one-piece and cut on the bias - will they work? Will I be able to sew together and fit this Creation? And of course the pocket pieces and trim remain to be drafted. And I have lots of concerns sewing with heavy melton.
I would *not* take on this project without you all, so thanks for the support. Next stop, muslin!
Elizabeth
| BWOF 9/05.102 | MelissaF, LisetteM, KayY |
| BWOF 10/06. | LindaF |
| Burda 7855 | LauraM, LindaF, Rose |
| Burda 8022 | ChristineB, Dawn, |
| Burda 8171 | Heidi |
| Burda 8292 | NancySeattle, Silver Threads |
| Butterick 4663 | SuitYourself |
| Butterick 4665 | Adrienne, Sigrid, Rosemary |
| Butterick 5145 | EricaB, Patrice, Jean-in-NC, Alethia |
| Marfy F1414 | Jenny |
| McCalls 5247 | Jamie, LindaDanville, Digs |
| McCalls 5513 | Sandra |
| McCalls 5525 | Lucinda |
| Neue Mode 23448 | SuitYourself |
| Patrones n247.30 Patrones n249 Self Drafted | Tany Angela O Gry |
| Simplicity 3672 | Silver Threads, |
| Simplicity 4084 | Silver Threads, NancyK, Susan (FabricLuver) |
| Simplicity 4403 | ClaireC, Erin, Patrice, AnnB |
| Vogue 1032 | Zoubida |
| Vogue 1266 | Laura, Diggs |
| Vogue 2475 | Caity |
| Vogue 2873 | Marji, EricaB |
| Vogue 2884 | PattiF, Susan (FabricLuver) |
| Vogue 2922 | Marji, Summerset |
| Vogue 2935 | Nneka |
| Vogue 2988 | Elizabeth |
| Vogue 7978 | LindsayT, Carolyn, MarilynB, MaryOK Merry-one |
| Vogue 7979 | Robin |
| Vogue 8299 | Vicki |
| Vogue 8306 | NancyK, |
| Vogue 8346 | Lisa, Bonnie, Gaylen, ClaireS |
| Vogue 8438 | KarenT, Adrienne, Cennetta, Kellie |
| Vogue 8480 | Bonnie, Patrice |
| Vintage or OOP editions | Marji, CafeCouture, Shannon, Marguerite, MarilynB, BarbaraP, Susanne |
| Men's | MichelleL, Jamie |