
Like Digs, I'm still working on my coat, but at least I'm making progress again!
I got as far as the material gathering, muslin fit and alterations, and even sewed together the body pieces of the coat before I lost momentum in August. The half-finished coat has hung in my sewing room ever since, taking up valuable space and making me feel bad every time I glanced at it, but the abnormally freezing cold temperatures we've had in London have made me jump back in with both feet to get this finished, because I could really use this on my daily walking commute to work. I've got a RTW long wool coat, but with the wind and extreme cold we've had, I can feel the cold through what I've got now (the papers are gleefully reporting that, at -10C, London is colder than Antarctica right now, and I've lost count of the number of Russian-style fur hats I've seen out and about).
My biggest stumbling block, and the reason my progress halted was that in order to proceed, I had to make the bound buttonholes, which I've never done before, and quite frankly, was scared of. But I'd learned to make welt pockets recently and I figured these were essentially like tiny welt pockets, so that gave me the confidence to finally sit down and try.
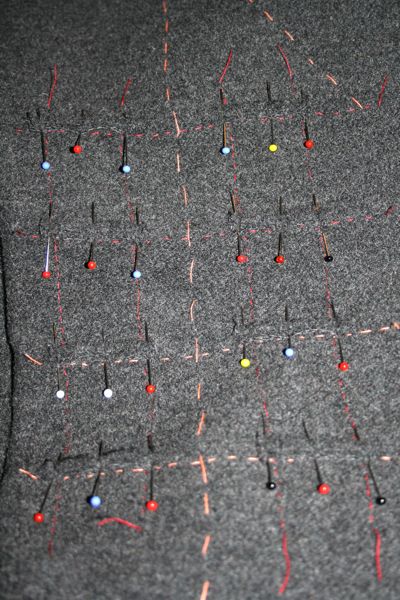
Here they are as I pinned the first lips onto all the basted placement lines, with three pins per lip!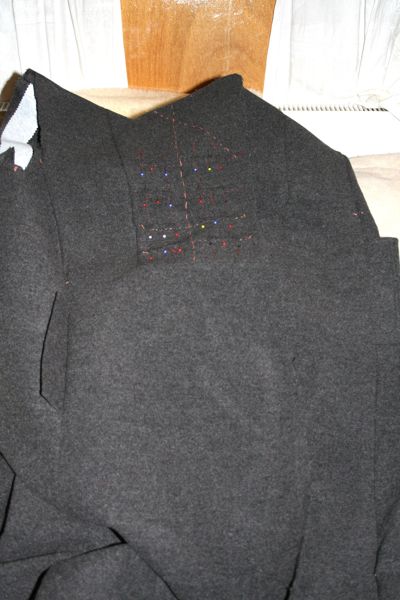
After making ten of these for this coat, I wouldn't say I'm an expert, but I'm certainly not scared of them any more!
Even back in May, I knew I needed to make this coat extra, extra warm to withstand my daily windy commute, and the way to make a coat warmer is to interline the body and upper sleeve with an extra layer. I decided on microfleece as my interlining of choice way back in June after discarding Thinsulate, if you recall... 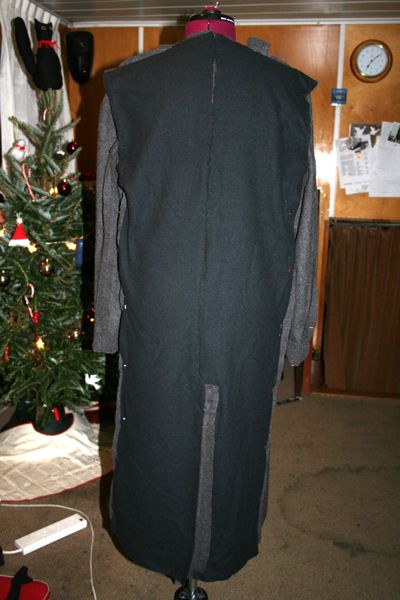
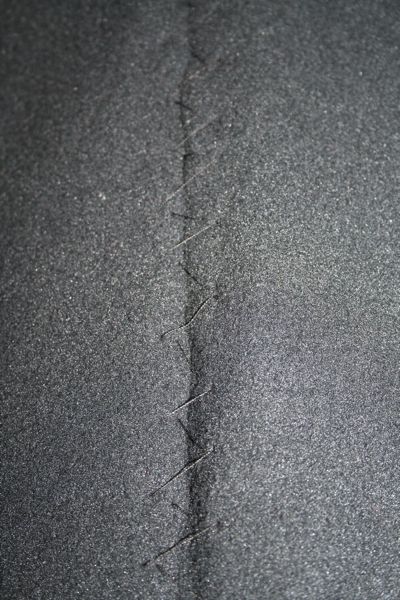
I won't lie to you - this took forever to hand sew (and I hate hand sewing!) so I'm glad I had several days off work to just sit on the couch with the dressmaker's dummy next to me to work on it. I certainly wouldn't interline every coat in the future, but for a long, thick coat like this, I think it's going to be worth it.
After the interlining was attached, I then inserted the shoulder pads and sleeveheads, and shaped and attached the collar pieces. 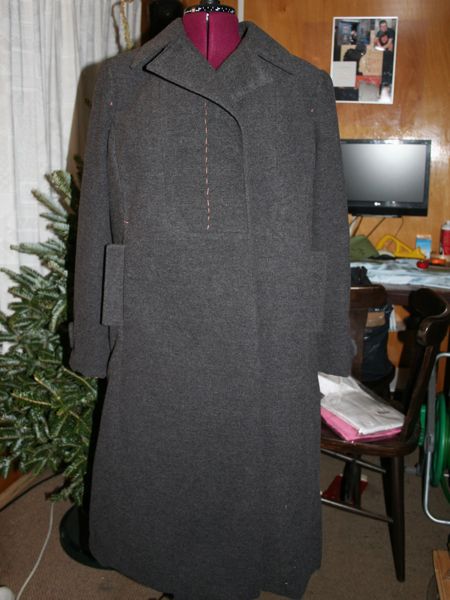
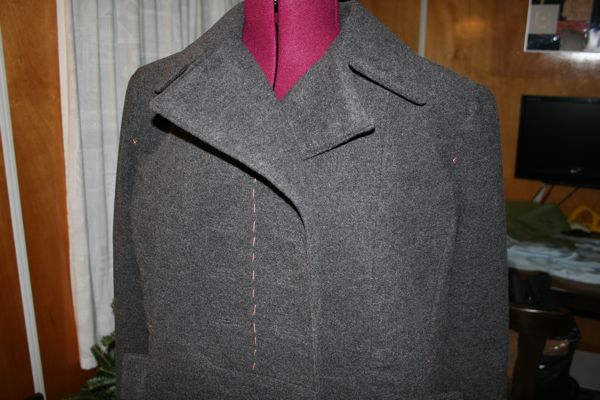
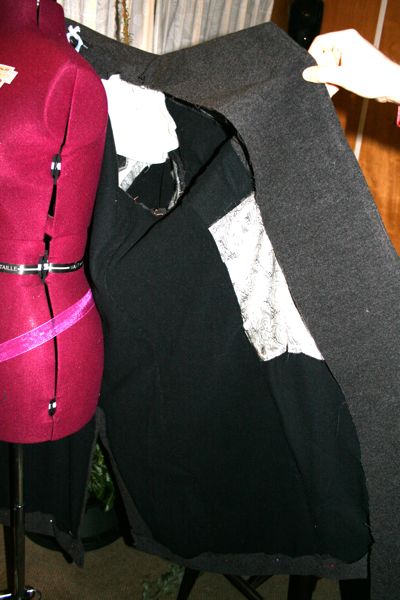
Notice how the white pocket bags in the third photo are on the interior side of the interlining so my hands should be nice and warm inside!
So it's looking like a real coat now, but I still have to finish constructing the lining, then I'll attach it by machine to the top and sides, and finally hand sew the hem and sleeve hems! If you're reading this and you haven't gotten as far along on your coat as you'd liked (and I've not seen anywhere near 100 completed coats here, so I know Digs and I aren't the only slackers!), then step forward and do something on your coat, anything, to get your momentum going again! I was once like you!
(I left out some bits here, so if you'd like to read the full account, head over to FehrTrade.com)
Showing posts with label buttonholes. Show all posts
Showing posts with label buttonholes. Show all posts
Thursday, January 8, 2009
Conquering bound buttonholes and interlining

Sunday, November 2, 2008
Tany's coat: satin tape and more on the buttonholes
As promised, I’ll show you some details before starting the padstitching on the coat. For attaching the interfacing, tapes and reinforcements I’ll be referring to Paco’s tutorial.
Let’s start by the satin tapes around the waist, which must be set before the interfacing and after stitching all the vertical seams of the coat’s body; the satin tape is hand stitched because I didn’t want to take the risk of damaging the velvet by using the sewing machine:

Another detail is the buttonhole treatment after basting the canvas in place. The right front interfacing must have the buttonholes cut out as rectangles, slightly bigger than the buttonhole size:

The buttonhole’s SAs are slipped through these rectangles as seen in the next picture:

The canvas is then hand basted to the front; the buttonhole Sas are trimmed, graded and tacked down to the interfacing:


Now I’m ready to start padstitching!
Let’s start by the satin tapes around the waist, which must be set before the interfacing and after stitching all the vertical seams of the coat’s body; the satin tape is hand stitched because I didn’t want to take the risk of damaging the velvet by using the sewing machine:

Another detail is the buttonhole treatment after basting the canvas in place. The right front interfacing must have the buttonholes cut out as rectangles, slightly bigger than the buttonhole size:

The buttonhole’s SAs are slipped through these rectangles as seen in the next picture:

The canvas is then hand basted to the front; the buttonhole Sas are trimmed, graded and tacked down to the interfacing:


Now I’m ready to start padstitching!
Monday, October 27, 2008
Tany's coat: bound buttonholes
This is a very time consuming project and I am extra limited because the fabric is black and I avoid sewing black fabrics at night, hence my progress has been so slow. Up to this point I’ve made the buttonholes (the welts were hand sewn in place), sewn all the body’s vertical seams (I left the shoulder seams open), tacked down the SAs and I started hand sewing the satin tape to the waist of the coat. The main reasons for all this hand sewing are: the presser foot could flat down the pile when sewing on the right side of the fabric and avoiding the slide effect when joining two layers when at least one has pile (sewing straight is very difficult because of this sliding effect). I could minor this problem by extra hand basting but I’d risk damaging the satin tape. Hand sewing provides more control and the result is much neater; the only disadvantage is that it takes extra time to get done.
Today I will show you the buttonholes; I used the “window” method, explained in a previous article at my blog (read it here). The only difference is that I’ve hand sewn the welts on instead of topstitching them.
The window method always uses a patch to make the “window”, a small rectangle of sheer fabric on the same color as the fashion fabric. It is placed on top of the buttonhole marked set place on the right side. Then a rectangle (the size of the finished buttonhole) is stitched, using a short stitch setting, and then it’s cut (both patch and fabric). The patch fabric is slipped through the resulting hole to the wrong side of the jacket/coat front, and pressed (see the link to the tutorial provided above for more details and pictures). I used black silk organza for the patch, and the resulting “window” is this (right and wrong side):


After stitching both welts together using a long stitch/loose tension setting, I made a few long running stitches using contrasting thread (basting cotton in this case) so I could see the two welt junction and better center it on the buttonhole window:

In the following picture you can see the process of hand sewing the welts to the buttonhole window (take extra care so each stitch goes through all the fabric layers so the resulting welt is sturdy).

This is how it looks on the wrong side; the canvas will have slightly bigger cut out rectangles at the place of the buttonholes and the allowances you see in the picture will pass through those rectangles when the hymo is set in place on the right front piece. These allowances must be trimmed and graded, and finally tacked down to the hymo. I will share some pictures when I get there.

This is how the buttonhole looks on the right side:

In the meanwhile I’ve started hand sewing the satin tapes around the waist of the coat. I will share pictures when I’m done!
Today I will show you the buttonholes; I used the “window” method, explained in a previous article at my blog (read it here). The only difference is that I’ve hand sewn the welts on instead of topstitching them.
The window method always uses a patch to make the “window”, a small rectangle of sheer fabric on the same color as the fashion fabric. It is placed on top of the buttonhole marked set place on the right side. Then a rectangle (the size of the finished buttonhole) is stitched, using a short stitch setting, and then it’s cut (both patch and fabric). The patch fabric is slipped through the resulting hole to the wrong side of the jacket/coat front, and pressed (see the link to the tutorial provided above for more details and pictures). I used black silk organza for the patch, and the resulting “window” is this (right and wrong side):


After stitching both welts together using a long stitch/loose tension setting, I made a few long running stitches using contrasting thread (basting cotton in this case) so I could see the two welt junction and better center it on the buttonhole window:

In the following picture you can see the process of hand sewing the welts to the buttonhole window (take extra care so each stitch goes through all the fabric layers so the resulting welt is sturdy).

This is how it looks on the wrong side; the canvas will have slightly bigger cut out rectangles at the place of the buttonholes and the allowances you see in the picture will pass through those rectangles when the hymo is set in place on the right front piece. These allowances must be trimmed and graded, and finally tacked down to the hymo. I will share some pictures when I get there.

This is how the buttonhole looks on the right side:

In the meanwhile I’ve started hand sewing the satin tapes around the waist of the coat. I will share pictures when I’m done!
Monday, September 29, 2008
Guide: Buttonholes
Because bound buttonholes must be made at the beginning of construction, you need to make a decision about buttonholes early on in your construction process. If you're going to make handworked or machine worked buttonholes, once you've made that decision you can forget about them for awhile. If you decide to make bound buttonholes, then you need to work those in the front before you stitch your shoulder seams or side seams.
Buttonholes:
- Bound buttonhole - make these before front facing is attached, then finish back through facing after garment is fully assembled. These are a hallmark of a finely tailored women's coat or jacket. You will not find these on men's coats.
- Hand worked buttonhole - these are worked after garment is fully assembled.
- Machine worked buttonhole - these are worked after garment is fully assembled
You have the choice of making Bound Buttonholes, appropriate for women's coats, and the time to make them is before the jacket is put together. Because your entire front should be interfaced with the hair canvas or interfacing that you're using to support and shape your lapels, it is a good idea to put your buttonholes in before applying the hair canvas. The hair canvas should not be sewn into your bound buttonhole. It is appropriate to add an alternative interfacing in the area of the buttonhole.
For any method you'll first need to mark your coat front with a "ladder" to make sure that your buttonholes are consistent and lined up. Using thread tracing stitch the CF line, then a line for each end of the buttonholes - so you now have 3 vertical lines. Then you'll add the horizontal lines to mark the placement for each buttonhole.
3 methods of bound buttonholes:
What I call Patch and Wrap - I'm honestly not certain if there is really a name for these. After the patch is cut through the center, the patch is wrapped around the seam allowances in the center and stitched down.
- Summerset has already written a great tutorial for this here
- Simplicity has a clearly illustrated tutorial here
- A tutorial for another patch method may be found at Vintage Sewing site.
Corded Bound Buttonholes: Does anyone have an illustrated source for the old fashioned way to make the corded bound buttonholes? The type where you make a corded piping, then sew the piping to the buttonhole box, cut the fabric, then turn the corded piping through and stitch the triangles on the ends?
Hand worked buttonholes
I chose to make hand worked buttonholes for my military style jacket, made with a cashmere/wool blend coating weight wool. I just thought that bound buttonholes would not be in keeping with the style of this jacket. And, just to show you that I'm along with all of you, I'm having to make samples, work on technique, and practice some of this stuff that I don't do often. I'm going to post pictures of the first sample buttonholes I've been making for my jacket. It's obvious that I need to practice. But, I'm showing you my first and second buttonholes here - which are pretty miserable. Thankfully, by the time I got done with my 6th they're looking much much better. If you click on the picture it'll get large enough to see.

These are the epaulettes that go on the shoulder. I made one set that came out lopsided, even though I carefully marked my seamlines, so I used them to practice the topstitching and buttonholes. The topstitching is by machine, using a 5mm stitch and Madeira Lana thread. I'm very pleased with the look of the topstitching. I had to experiment with widths from the edge.
I made my first hand worked buttonhole using Madeira rayon embroidery thread. Too shiney, and the stitches were really uneven. The second buttonhole I tried using Madeira Lana thread, doubled. Too heavy, although I like the matte finish of the thread on the wool, and again, I still need a lot of practice with the handstitching.
Next I tried the regular Gutterman All purpose thread, doubled and waxed. The thread buried so deep into the wool that it didn't look as if there were any buttonhole there at all. So then I tried a single thread of the Madeira Lana wool thread. It's what I ended up deciding to make in the epaulettes.
I've made the buttonholes for the epaulettes and stitched them onto the shoulders of the jacket. I'll practice more before making them for the front. I'm being realistic, even the 5th and 6th hand worked buttonholes I made weren't anywhere near perfect enough for the front of a jacket. But the epaulettes will never be unbuttoned, and those buttonholes will not show. I did want working buttonholes up there, I think it's better looking than just popping a button on top and stitching the end of the epaulette down.
Machine Worked buttonholes.
All I can say, if you're planning on making buttonholes by machine is "Sample sample sample!" Practice before you make your first one.
Subscribe to:
Posts (Atom)


