
Like Digs, I'm still working on my coat, but at least I'm making progress again!
I got as far as the material gathering, muslin fit and alterations, and even sewed together the body pieces of the coat before I lost momentum in August. The half-finished coat has hung in my sewing room ever since, taking up valuable space and making me feel bad every time I glanced at it, but the abnormally freezing cold temperatures we've had in London have made me jump back in with both feet to get this finished, because I could really use this on my daily walking commute to work. I've got a RTW long wool coat, but with the wind and extreme cold we've had, I can feel the cold through what I've got now (the papers are gleefully reporting that, at -10C, London is colder than Antarctica right now, and I've lost count of the number of Russian-style fur hats I've seen out and about).
My biggest stumbling block, and the reason my progress halted was that in order to proceed, I had to make the bound buttonholes, which I've never done before, and quite frankly, was scared of. But I'd learned to make welt pockets recently and I figured these were essentially like tiny welt pockets, so that gave me the confidence to finally sit down and try.
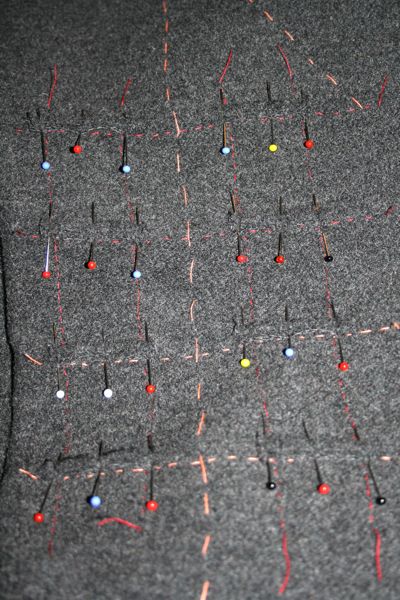
Here they are as I pinned the first lips onto all the basted placement lines, with three pins per lip!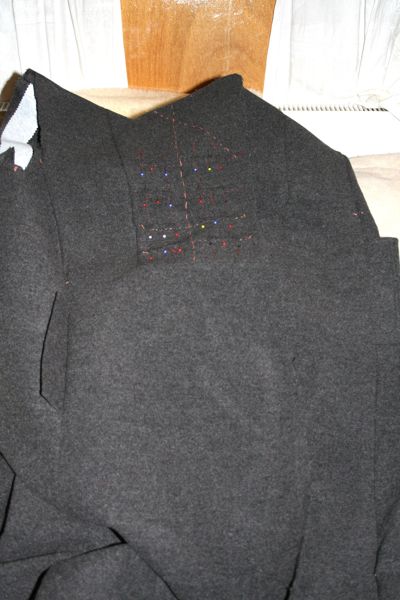
After making ten of these for this coat, I wouldn't say I'm an expert, but I'm certainly not scared of them any more!
Even back in May, I knew I needed to make this coat extra, extra warm to withstand my daily windy commute, and the way to make a coat warmer is to interline the body and upper sleeve with an extra layer. I decided on microfleece as my interlining of choice way back in June after discarding Thinsulate, if you recall... 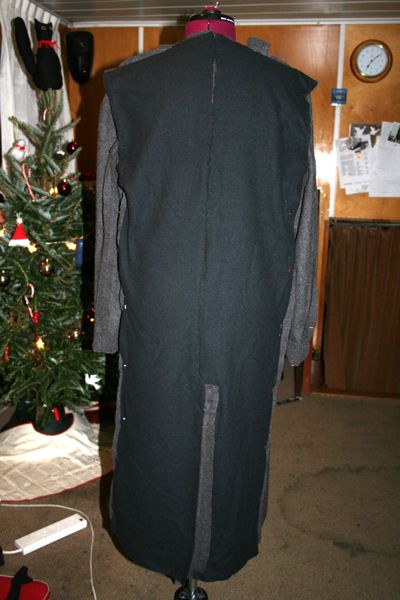
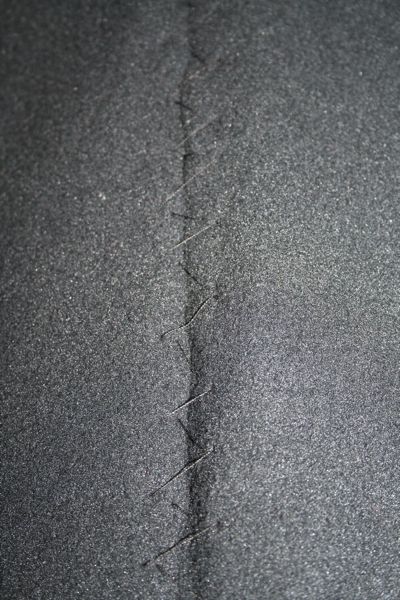
I won't lie to you - this took forever to hand sew (and I hate hand sewing!) so I'm glad I had several days off work to just sit on the couch with the dressmaker's dummy next to me to work on it. I certainly wouldn't interline every coat in the future, but for a long, thick coat like this, I think it's going to be worth it.
After the interlining was attached, I then inserted the shoulder pads and sleeveheads, and shaped and attached the collar pieces. 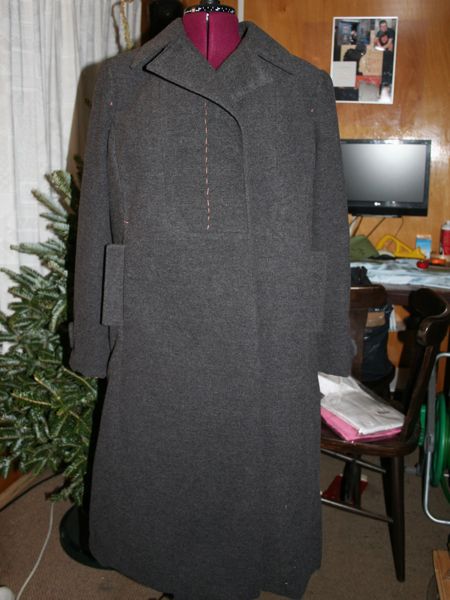
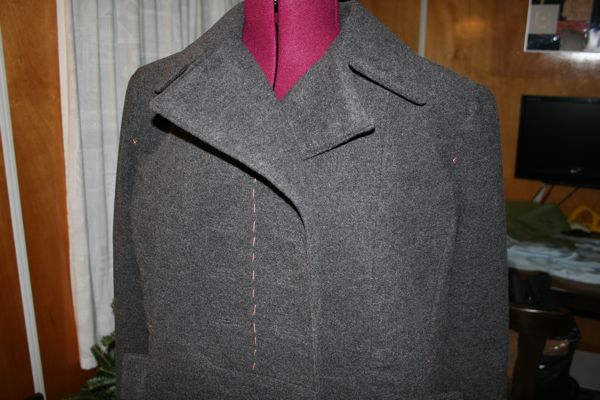
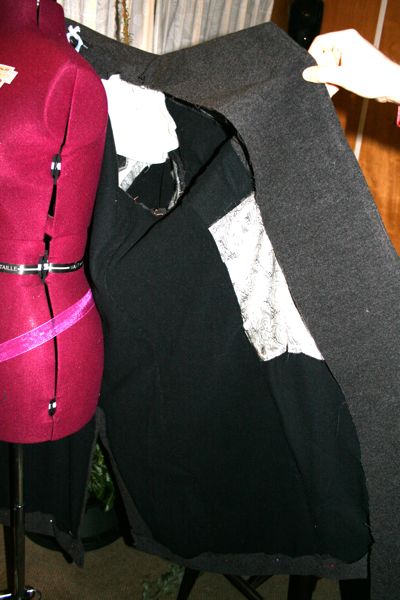
Notice how the white pocket bags in the third photo are on the interior side of the interlining so my hands should be nice and warm inside!
So it's looking like a real coat now, but I still have to finish constructing the lining, then I'll attach it by machine to the top and sides, and finally hand sew the hem and sleeve hems! If you're reading this and you haven't gotten as far along on your coat as you'd liked (and I've not seen anywhere near 100 completed coats here, so I know Digs and I aren't the only slackers!), then step forward and do something on your coat, anything, to get your momentum going again! I was once like you!
(I left out some bits here, so if you'd like to read the full account, head over to FehrTrade.com)
Showing posts with label interlining. Show all posts
Showing posts with label interlining. Show all posts
Thursday, January 8, 2009
Conquering bound buttonholes and interlining

Thursday, September 11, 2008
Guide: Underlining and Interlining
For the purposes of clarity I've isolated this part of the post from the post of July 30 on layout, since the information appears to have been buried too deep in the post. --Marji
For those using a sewn-in underlining for structural support:
Your next step is to cut out and mark your underlining using all the body pieces that will be underlined and not interfaced. This is typically:
- side back
- back
- upper sleeve
- under sleeve
- side front (unless you have a welt pocket extending into the side front, in which case you'll be interfacing and not underlining your side front.
Ann wrote a nice tutorial about a month ago on underlining. I'd like to excerpt her instructions here regarding mounting the underlining to the face fabric.
From Ann:
Attaching the underlining
First - pretreat your underlining. Shrink it before you cut into it, so you don't have a disaster later. Also make sure you cut your underlining on the same grain as the fabric. For precision, use a single layer cutting layout for your underlining. After all, if you're taking the time to do an underlining, you might as well take the few extra minutes to get it perfect, right?
Once it's cut, I attach the underlining to the fabric by hand basting it to the body of the fabric. My basting stitches run parallel to the grain of the fabric. They are 1 to 1 1/2 inches long, and I catch just a thread or two of my shell fabric at each stitch, as you can see here:

This takes time, but it's far superior to basting only at the seamlines, because it structurally reinforces the shell fabric. This is critical for areas that will receive a lot of stress from being bent and sat on, like elbows and rumps. It helps your fabric retain its shape. It's really, really important if you're using a cashmere or fur fabric, which has a tendency to bag out.
Thank you Ann!
Along with her mounting method, I like to stitch along the stitching lines too--which acts as thread tracing as well as holding the two layers together along the stitching lines.
__________________________________________
For those using interlining to add warmth, not structural support:
You may attach your interlining, depending on what it is and how bulky it is, in one of several different methods. If you're just using a layer of cotton flannel I'd be tempted to treat it the same as underlining and use the method outlined above. If you're using Thinsulate or a fleece or lambswool as a layer for warmth, that layer is likely to be bulkier than you'll want in your seam allowances.
Below is a picture of how you may want to insert the interlining to keep it out of the seam allowances. The picture on the far left (in red) is an inside-out illustration of the coat with interlining, sans seam allowances, catch-stitched to the constructed body of the coat. I'd recommend waiting to cut the interlining until after the first garment fitting.
The Complete Book of Sewing
By Constance Talbot
 _______________________________________
If you're looking at Paco's tutorial, he's basted the interfacing on using a stitch that holds the interfacing in place securely, and will come out after the garment is stitched together.
If you're looking at Ann's tutorial above, those long stitches only go through the first thread or so, not all the way through, so they don't show on the outside, and those stitches are meant to stay in.
There are more ways than one to do any of these steps. Ann wrote the instructions to mount the underlining using an allover basting stitch that stays in. This is especially relevant in making a coat where there are larger expanses of fabric between seams, or, as Ann noted, when using more fragile fabrics that are more susceptible to deforming. Paco illustrated his jacket using perimeter basting stitches that come out. Both are correct.
____________________________________________
Conclusion:
At this point, you now have all your fashion fabric (coating) fabric cut out and your seamlines marked. Make certain that you also mark your match points, notches, etc., too. I use tailor tacks, or on a cotton underlining a wash-away marking pen for those types of markings. Chalk has limited shelf life for marks, so if you're going to reference the marks in fairly short order, chalk is good too. If your coat pattern included lining pieces, you should have transferred all of your alterations to your lining pieces also.
____________________________________________
As promised - Here is the link to the Flickr set containing all the pictures from today's post. If you're interested in seeing any picture in full size, click on the "all sizes" icon just above any pic, and it'll take you to a larger photo.
I'm out of town now, writing on my laptop in the hotel breakfast room. When I get home I'll take some photos showing how to hold your lapel while padstitching. I'll also get some photos of my underlining mounted to my jacket.
Friday, May 30, 2008
Underlinings and Interlinings
Underlining / Interlining / Interfacing
Fusible / Sewn-In / Combination
Fusible / Sewn-In / Combination
Traditional tailoring is done with traditional materials and sewn-in interfacings. However, in light of today’s improved processes for creating quality fusibles, and in consideration of time and cost, even High end designers are using some fusibles in their Pret-a-Porter jackets and coats now.
What you choose now will, to a great degree, effect the final drape and shaping of your coat. For best results, you should sample Before you start mounting and fusing your fabrics.
Underlining – Body and Sleeves Only
supports the fashion fabric
Underlining is mounted to the fashion fabric prior to sewing, then both fabrics together are treated as one.
Use with Fabrics that need stability:
• Boucle
• Loosely woven tweeds
• Soft animal hair fiber fabrics such as Cashmere and Mohair
• Any fabric that feels fragile,
• And, May be needed for wool flannel if pattern has full heavy skirt (such as V8307 and V8346
Not necessary for most wool flannels that are coating weight, wool tweeds that are tightly woven, and Melton.
Fabrics for Underlinings
• Fine cotton batiste
• Cotton broadcloth or high quality muslin
• Silk broadcloth
• Cotton/silk batiste blend
• China silk
• Cotton flannel – as underlining/interlining (preshrink!)
- Fusible - textured weft insertion products such as Armo-weft, Angel-weft
Interlining – Body and Sleeves Only
Provides added warmth
Interlining is treated the same as underlining, except that it is a layer intended more to add warmth than stability.
If you’re using fabric that requires an underlining, use one that serves both as support and warmth such as cotton flannel, OR use a lining such as flannel back satin that serves the dual purpose. In any event, do not plan to underline, interline, and line.
Fabrics for interlining
• Cotton flannel
• Lambswool interlining – soft as a cloud, expensive and difficult to find
• Lightweight Thinsulate TM
Source list:
See links on sidebar for
Farmhouse Fabrics - batiste and broadcloth
Vogue Fabrics - cotton flannel in many colors
MacPhee - Thinsulate
leave your suggestions for sources in the comments, and I'll add links
Subscribe to:
Posts (Atom)


