Quite some time ago, before his August holiday, PacoPeralta offered to write the directions for pad stitching and shaping the lapel and collar; and Tany graciously offered to supply an English translation.
I'd like to thank each of these individuals for their contributions. Please enjoy the very complete following tutorial.
The achievement of the perfect hang on a tailored garment doesn’t rely exclusively on the choice of the right fabric, fit and the mastering of the best sewing techniques; the choice and care invested on the underlying structure (underlining, interfacing, padding, etc.) is very important. Though it is not seen from the right side of the garment, this underlying structure must be thoroughly planned and constructed. For light jackets and coats it is advisable to use thin woven interfacing. For heavier fabrics, the best choice is hymo interfacing (horsehair, wool or blend of both) canvas interfacing (sometimes referred as tailoring interfacing) and also stabilise the fashion fabric by the use of underlining (“triplure”).
The next pictures illustrate the construction steps for achieving the optimal underlying structure.
First, if we are dealing with a lightweight fabric like velour, bouclé, etc. we must reinforce all the fabric parts by underlining. In this case I’ve opted for the use of bi-elastic fusible interfacing (nylon fusible knit), which stabilises the fabric without changing its body (photo 1 and 2).
After stitching together all the front pieces (center panel, middle panel and side panel), we must apply the tailoring interfacing to the front (photo 3).
When using woven interfacing, we must assure that the grain of the interfacing matches the grain of the center panel – CF or Center Front). The interfacing is hand basted (long straight or diagonal running stitches) along the front edge, roll line, etc (see photo 4).
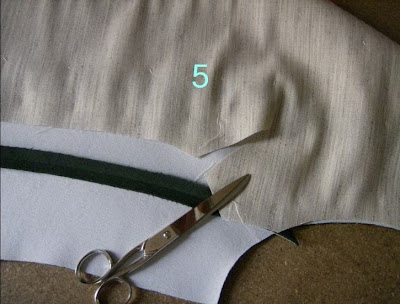
We make a small diagonal cut at chest height (photo 5) to be able to shape this area.
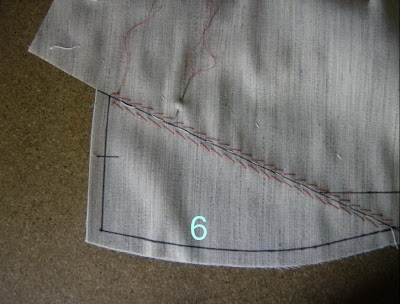
The padstitching of the lapel (photo 6) should begin a few millimetres behind the roll line. It is very important that when holding the lapel in your hands for padstitching, you roll it over your hand so there will be less fashion fabric underneath the interfacing and the round shape is permanently set as you padstitch. These stitches should be barely visible on the fashion fabric side. The padstitching is formed due to alternating ascending and descending small diagonal stitches parallel to the roll line, forming a chevron pattern; you should catch only one or two yarns from the fashion fabric underneath the interfacing. Do not stitch over the seam allowances.
For the collar it’s the same procedure. The undercollar and the interfacing are cut on the bias with a central seam (photos 7 y 8).
The undercollar will be padstitched on a similar fashion as the lapels. Personally I prefer to padstitch the collar following a longitudinal direction, stitching a few rows close to the neck stitching line to hold the fabric and then shaping it round by working the rows from the neck stitching line to the collar edge (photos 9 and 10). There is yet another way, which is starting from the middle on an obliquely direction.
Once these operations are done, we observe that there is a little extra fashion fabric along the lapel and collar edges; this extra fabric should be trimmed away so the interfacing and fabric SAs (Seam Allowances) are even (photos 11 and 12).
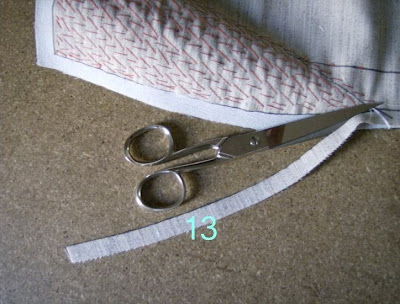
Next we trim away the interfacing SAs and carefully catch-stitch trimmed interfacing edges (photos 13 and 15)
Finally we catch-stitch the interfacing along the armholes (photo 14) and secure the interfacing in place along the vertical seams by making long diagonal running stitches (photo 15).
In photo 16 (collar and lapels padstitched) we can observe the final result and the obtained round shape on both the lapels and collar.
The lapel edges and roll line must be stayed for stability; the twill tape (pre shrunk) is hand sewn in place over the interfacing, one edge against the seam line, and whipstitched on both sides, ending on the lower edge (photos 17 and 18):
If additional reinforcement is required, we can add a chest shield made of pure horsehair or extra strong interfacing (much stiffer). It is basted in place over the interfacing all but along the shoulders and armholes, which will be finished after setting in the sleeves (photos 19 and 20). The shoulder seams are stitched.
Photo 21 shows the outcome of the previous steps:
Note from Marji:
If you haven't already, at this point it is appropriate to make the bound buttonholes in the right front (women’s coat or jacket). You want to make sure to cut a square out of the hair canvas, as your buttonhole should not be made through the hair canvas. It would make for too bulky a buttonhole.
It's also the appropriate time to make the welt pockets if there are any, see additional posts for info on pocket and buttonholes.
Next, we will join the uppercollar to the front facings. Then the facing is stitched along the front edge (on the interfacing side), ending at the collar notch point (point where collar meets lapel) (Photo 22).
It’s very important to stitch a few reinforcement stitches across the lapel corner (Photo 23) to blunt the corner. This will ensure a perfect lapel corner.
The seams are pressed open using a sleeve board or tailor board, SAs are graded (and clipped/ notched as necessary) and the corners are notched (Photo 24)
Then the facings are turned to the right side and the edges are basted and pressed, maintaining the round shape of the lapels. The upper collar is stitched to the neckline and the inner edge of the facing is catch-stitched to the interfacing (photo 25).
Now its time to sew the undercollar to the collar and, as we did previously with the lapels, we press the seams open, grade, clip the corners, etc. The undercollar is hand stitched to the base of the neck, turning under the SAs and using invisible stitches (Photos 26 and 27). After finishing with the remaining construction process (setting in the sleeves, hems, etc.), we are ready to give the garment a final press and proceed with making the lining.
After a time consuming mostly by hand process, we can add a certain “Vintage” or “Couture” look to our garment by applying the lining on a handcrafted manner. After the lining is constructed, it is pinned in place on the outside-out garment and stitched entirely by hand along the facings with tiny invisible stitches (Photo 28).
Photo 29 illustrates the end result for the sportive notched collar with lapels:
INNER STRUCTURE BY USING FUSIBLE INTERFACING
If we wish to make our garment (jacket or coat) using faster methods, not at all less effective, we can use fusible interfacings. This is the procedure for using fusible interfacings as the underlying structure of a tailored garment:
1) We fuse the interfacing to the appropriate fabric parts (front, side panels, facings, collar, hems, etc. We also fuse special purpose reinforcement tape to the armholes, lapel and front edges. A good practice is applying the tape in a way that it holds to the inner (not seen) edge, which is the lapel on the front piece and the front edge on the facing (photo 30).
In this case I also added an additional chest shield that can be held to the roll line at the same time with the fusible tape. For this purpose I’ve used a 2cm wide fusible tape (photos 31 and 32). A strip of thin fusible interfacing cut on the grain can also be used for this purpose.
We will proceed as explained before: applying the facings to the front (photos 33 and 34), seam treatment (photo 35), etc.
In this particular case, we can apply the front facing with the lining already attached to it and catch-stitch it down to the front facing using wide stitches (photo 36).
As an added extra, I will show you an easy way to attach the collar that provides an excellent end result.
We’ll need a commercial ready-made undercollar (it’s made of felt, already interfaced and can be bought at special purpose tailoring/dressmaking notion stores). We’ll also need to cut the upper collar with about 4cm SAs on both sides.
Next we trim the undercollar SAs (photo 37):
The under collar is stitched using a machine zigzag stitch to the upper collar (right side) along it’s wide edge, matching under collar’s edge to the upper collar’s stitching line (photo 38).
Turn the under collar under the upper collar and stitch it to the base of the neckline using sideway stitches (photo 39).
Finally we turn the collar narrow edges to the undercollar and hand stitch these edges to the felt undercollar (photo 40).
Photo 41 shows the final notched collar using this method:
CONCLUSION: Obviously, these techniques are not necessarily strict and incompatible. We must not forget to test first, because there are many variables involved, as the quality/characteristics of the fashion fabric, the characteristics of the chosen model, etc. For most situations the two approaches (traditional and contemporary) are combined in order to meet our notions availability, necessities and skills.
Post in Spanish: “Paco Peralta” blog
Post in Portuguese/English: “Couture et Tricot” blog


14 comments:
I am deeply grateful to Paco for gathering all this information and sharing it with us. He did an outstanding job and I can only imagine how much time he invested in this. I only played a small part, translating the article from Spanish.
For me, the steps that were most revealing are the way that the undercollar is stitched by hand to the neckline and lapel edge (I followed this method when making my organza trench coat) and the added bonus tutorial for the commercial ready-made undercollar.
Again, many thanks to my dear friend Paco!
I am in awe. This post is amazing. I am looking forward to learning these techniques using this information. Thank you, Paco and Tany!
Mucho gracias Paco y Tany.
Paco - Your generosity knows no bounds. The information you provided is phenomenal. And I want to say gracias also for all the time you spent putting this information together. I know that I will now be able to take my sewing skills to a higher level. I am forever grateful for the gift you gave us here. Now there will be a part of Paco in every tailored garment I construct.
Tany - Thank you for translating this information for Paco. Working together on this must have been enjoyable. I know that it took a lot of your time to translate all this for us also. Gracias to you also for the time you spent on this project.
Thank you so much, Paco and Tany. The excellent descriptions and photos make these instructions priceless.
This is priceless indeed and I'm grateful to both Paco and Tany for their work!
Si, gracias. ¡Las fotos y instrucciones son muy beneficiosas!
Thank you so very much Paco for these detailed instuctions. I feel for the first time I have the information needed to make a wonderful coat and also many future tailored garments. I'm sure you spent many hours on this and please know it is greatly appreciated.
Thank you Tany for the translation and Marji for making it all happpen.
Now, I have got to get busy and I can't wait!
Susan
Marji .- thanks for the post and thanks to all for your very kind comments. greetings, Paco
Paco, thank you for one of the best tutorials on collar and lapel construction! And Tany, thank you for translating. You both are the best!
Ann
Paco & Tany - thank you so much for this tutorial. It is very generous of you both to put this together and share it with us !
Thank you, thank you, thank you. A perfect explanation, with perfect illustrations and descriptions. I'll be referring to it throughout the week as I pick up at this point of my jacket.
Stupid question here: If our coat has a stand-up collar, we don't need to do all these steps, do we? Anything special we need to do for stand-up collars?
Lindsay .- If your coat has a stand-up collar is not necessary as the work of points in the flaps. If you want to use tailor´s interlining, you can follow the steps 14 and 15 and secure in lines of stitching. Sincerely, Paco.
Also, thank you all for your compliments
Thank you so much Paco and Tany,the tutorial was very well appreciated. Its a good reference from time to time. God Bless.
Post a Comment