Saturday, June 28, 2008

Tany’s coat: Initial pattern alterations

I’m a little late on my coat because life sometimes gets in the way, but today my mind is set to get the muslin ready for a first evaluation. Before cutting the muslin, I traced my usual Patrones size (42), tracing the pattern in between the available scaled sizes 40 and 44. This is not difficult to do, and I wrote an article about this procedure some time ago: "Tracing in between Patrones patterns". In the following pictures you’ll see that I traced both 40 and 44 sizes in black, kept the common lines and traced the size 42 lines using a blue pencil; all the alterations made previously to cutting the muslin and trying the coat on me were traced using a red pencil. At the present time I have the pattern ready for cutting the muslin and determine if I need further more alterations. NOTE: the pattern has no SAs included.

This is a straight coat, no flare so I decided to apply the method for adding walking ease explained in the book “Couture, The Art of Fine Sewing” by Roberta Carr. The book explains how to add the walking ease on a basic front pattern; this coat is a little different; you have to imagine the basic front block pattern that lies within the coat pattern for determining the starting point for your new slightly off-grain front edge. Here are some pictures that illustrate how I performed this alteration:

You can see where is my starting point for tracing the new outer edge that passes at ½ inch from the original front edge at the waistline level and prolongs to the hem:


I always measure my pattern before I cut the fabric (or the muslin, in this case). The only obvious alteration was narrowing the waist, since the original pattern corresponds to a waist circumference of 38 ½ inches (measuring the pattern at the waist level, starting at the CF line and not at the front edge), which is too much (my waist measures 30 ¾ inches). So I reduced the pattern waist circumference by 3 ¼ inches, distributed along the vertical seams:

The back:

The front:


Another thing I did was adding the “turn of the cloth” extra to the upper collar, tracing another pattern using the original as a base start (this is just an estimate, since I will test the turn of the cloth on the final coat):

I did something similar on the front facing, at the lapels.

As a final note on this pattern, I'd like to add that Patrones has a funny way to mark the buttonhole placement: either what they call the Center Front line is not the real center front or the buttons are misplaced further to the edge; observing the original model's picture I think that it's the CF line which is not correct so I traced another CF line a closer to the edge; with the muslin on I'll be able to see if I'm right or not.

And this is it! I hope to show you the constructed muslin as soon as possible!

Friday, June 27, 2008

Marilyn B's 1st Muslin

I am sewing Vogue 7978 which is a popular choice since four other members are sewing the same pattern. This pattern has the shoulder princess line and two-piece sleeve which were recommended by Marji. I do like the classic lines of this pattern and am sure I will sew it again once it is fitted. I have chosen view D.

I adjusted my pattern by cutting a size 10 in the shoulders tapering out to at 12 at the armhole and adding an additional 1/2 inch at all seam allowances from the waist to the hem. I made all vertical seam allowances 1" and marked them in red and also marked the grainlines in black as well as the bust, waist and hip lines. I sewed the seamlines along the armholes and neckline, clipped them and pressed them back to the inside so that what is showing in my pictures is the actual seamline on the armholes and neck. I also cut off the seam allowance running down the front opening and pinned up the hem. The pocket openings are in the side seams and do no show since my arms are covering them, but I am pleased with the placement of them. Since I plan to wear this coat with suit jackets, I am wearing one under the muslin. It appears that this jacket is just a little too long on the shoulder, but it is well worn and I plan to replace this in the future and will make that adjustment on that pattern. The first set of pictures is without shoulder pads and the second set has shoulder pads.

Muslin without shoulder pads


Muslin with shoulder pads


What becomes obvious in the side pictures is that the side seam it tilting forward which I think is related to the folds in the lower back. I also think I need a forward shoulder adjustment. But I am looking for some expert advice before I make any adjustments and that is the main reason why I joined this sew along. What I have learned from taking pictures of my muslin is that the pictures really are a better indication of what needs to be adjusted rather than just relying on my eye and a mirror. I will definitely use this tool in the future. What also showed up in the photos is that I need to adjust my pictures on the wall.

Wednesday, June 25, 2008

Liana's Muslin - Fitting Part 2


For reference, here's the Marfy pattern I'm using.

(Working hard to get Marji's opinion before she leaves us to our own devices.)

I inserted the sleeves and the collar. (I love the collar!) Then I decided to narrow the back. I figured the pattern ease with their ideal measurements vs the ease with my measurements and found that I have more ease all around. I narrowed the CB seam by 1" at the bust, angling to 1 3/4" at the waist and hip. I also narrowed the side back seams by a little to make up the total ease difference. It turns out that I like the original better, I think. With the suit jacket on, the coat is too tight across the hips IMO, and although it's all right with just a blouse on, I like the drape of the non-changed silhouette better. So unless I hear differently, I think I'll make it up as is. I think in the cashmere, the back is going to drape much better than the muslin, and that will make a difference.

I worry a bit about the CF off-graining being too much, but again, you can't tell until you get it in the real fabric, and Roberta Carr says you can always cut it off with no ill effects, so that will be the first thing I check.

I do agree with the idea of a soft chest pad, although the sleeves and collar have helped a lot. I may put a little more padding on the right shoulder, at least in the back.

Here are many photos.
The first set is with No Changes and a Blouse underneath.


Back Narrowed and a Blouse underneath


Back Narrowed and a Suit Jacket underneath


Once again, all photos larger here.

Original post below. Should I delete this part?

There are horizontal lines at the waist and hip on the muslin although they're showing only faintly. I have the shoulder pads pushed out 1/2" out from the shoulder seam, which is marked also. The front edge is turned under and the hem is turned up. I have a suit jacket on under the muslin in the top 3 photos, and I realize that the collar is making those weird vertical lines, although originally I thought they were a hollow-chest thing. I have a low right shoulder, so I have a little extra pad (maybe 1/4") on the right.


All Photos Larger Here

I'm going to construct the sleeves but won't sew them in yet.

Marji: Alteration for forward shoulder at the muslin stage

Often, I think it's nearly impossible to tell, from photos such as these, whether or not someone needs a forward shoulder adjustment. Especially if it's already in the correct place at the neck, (which many have been.)

Claire has taken such a set of pictures though that provide us with some great opportunities to demonstrate where it is obvious and necessary to move a shoulder seam. So again, I'm co-opting Claire's pictures to show how to move the shoulder seam forward.

The black line I drew on Claire's neck illustrates how to determine where the shoulder seam should originate. It is in line with the back of the ear.

I would do this alteration after lifting the back neck for the forward neck alteration. (See previous post)

  1. Mark correct placement of shoulder seam on both front and back pieces. Here, it looks as if the back may be on or just over the cutting line of the current back.
  2. Rip out current shoulder seam.
  3. Attach another piece of muslin as extension to back at the shoulder.
  4. Fold front under at new shoulder seam line and pin along new shoulder seam line at back (in this case, almost along the old cutting line).
  5. Try on for fit. Adjust a bit if necessary. Stitch in place, still basting.
With a move this drastic, undoubtedly the sleeve cap is going to need adjusting too.
If you have a fitting book that demonstrates the change, great, look it up. If you don't, I'll try to get back to draw it up later.

I almost forgot: I think you may need to add room for a shoulder pad too, which means you will change the angle of the shoulder seam. This is what it would look like on the pattern draft. Back and front, equal, after moving it forward.


Right now I've got to finish laundry, pack, wrap shower gifts, and organize my household to manage without me for the next week. And I leave at 6 a.m..

Edited - Claire S. - V8346,View A - 1st Fitting

Edited with a question - thanks everyone for the comments.

Marji - I don't 'usually' do anything, swayback, or high round back...I'm too new at this. Anything suggested to me will require research or questions to all of you to figure out exactly HOW to accomplish adjustments. I have a couple of sewing books and I think they will be well used during this process.

That being said, thinking I would have to fix the bust before the waist, I did some reasearch on Cidell's suggested low bust adjustment and successfully did one side !!! I was AMAZED - it was my very first adjustment of any kind, I was giddy LOL

Sometime during that process I remeasured the muslin's back length and my own to find out they are the same and my waist should be right on - It's not, of course, so I was on my way back to ask what to do about it and lo and behold the answer is already posted - with pictures no less, thanks alot - I can do this.

Now, the question. One bust is adjusted, one is still way off. Do I do the other bust then the high round neck - or the neck first. I think fixing the neck will move the shoulders forward and the bust down, at least some, won't it ???


Here goes, I cut a size 16, basted every line, and sewed it together. I didn't think it was too bad til I saw the pictures. The grainlines are straight, the shoulders are in the right place (I'm pretty sure).

Here are my 'I thinks'

1) I think the length of the shoulders and the width of the upper back are ok
2) I think the bust points are too high (or I'm too low LOL)
3a) I think the stitched waistline is too low - if it is meant to be at the natural indent of my waist (that's about 1-inch higher)
3b) but the waist is too tight when I match up the CF - so would fixing the height of the waistline also fix this ?

Now, I don't know how to fix any of these, so here are my pics and request for HELP ! :-)

Front/Back


The 2 Sides


The 2 Shoulders


Marji: Altering in the muslin for high round neck


Blogger Marji said...

After you get the waist taken care of, and open out the side seam a bit through the waist area, you need to address the back neck. Do you usually make a high round back adjustment to your patterns?

It's accomplished by slicing your pattern horizontally from CB to armscye a couple of inches below the existing neckline, lifting the neck the amount you need (I'm looking here and thinking you might need as much as 1.25" although that's just a guess) and then trueing up your CB seamline.
Because you're already in the muslin, I'd draw the lines on the muslin, slice it open, insert a wedge of fabric and stitch it in.


Then check to see if the shoulder seam lies on top of your shoulder. It is common that a forward shoulder adjustment accompanies an adjustment for a high round neck, but not always.

Your shoulder seam should originate at the join of your neck and shoulder, just under the back of your ear, and lie on the top of your shoulder, terminating at the bone at the end of your shoulder. If you have trouble determining where that bone is, put your index finger on where you think it is while your arm is at rest, then start lifting the arm - you'll be able to feel the bone then. See next post. You do need it.


It is important that the shoulder seam be at the top of the shoulder, so that the sleeve hangs properly.
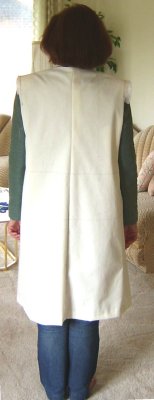
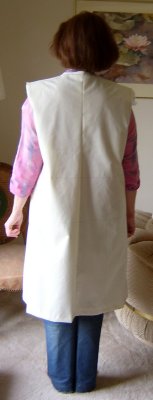
Once you've done these recommended adjustments, put both sleeves in, and put one collar on (you don't need to put on the under collar too) and see if it fits better.

Laura's muslin

I just erased my whole post! Ugh!!! Now it's late, so I'm just gonna have to make it short and sweet.

I'm making Vogue 1266, view C (brown coat) out of a dark red wool from Gorgeous Fabrics (Princess Red) with the cuffs and collar in black faux lambs wool from Emma One Sock. I have no clue on the lining yet.

I cut my size (based on the bust) straight from the pattern with no adjustments.

Pics with no sleeves:
I've got the shoulder pad in the left shoulder. I forgot to turn under / cut off the SA on the right. The waist hits my own waist perfectly. I do have 6" of ease in the waist and am missing a defined waist. As you can see there are some vertical folds in the back. Too much width? There's also one on the front by the bust.

I very much feel/look like a sack of potatoes.

Pics with the sleeve:
I'm thinking it's a size too big.

I have 6" of ease in the waist
and 6" of ease in the hip.
Again, I need a waist.

There's some goofiness going on at the CF, but I think it might be the way I've got it pinned. If you don't think so, please let me know.

The last pic is of the arm bent and pulling forward. There seems to be too much bunching going on. More than there should be.
I want to do bound buttonholes. I've never done them before either. I'd also like to do piping around the lining.

(Oh, can someone please tell me how to upload pics so I don't have to keep dragging them down to where I want them? Thanks!)

Let me know you you think. Thanks!

Tuesday, June 24, 2008

6/30 update Trench - Susan


These pictures were taken after I let out the seams from the waist down on the side, back, and front & back princess seams. I think there may some some extra fullness now that I will get rid of. For starters I will take the front princess seams back in and try it on again. If it still has extra, then I will take in the back princess seams. Or would it be better to adjust the side seams first?

I do have shoulder pads in and the arm syce seems ok. I am unsure if the arm syce starts in the right place - is it too far out?

I now have the waist marked - it is about 1" high. I think I should lengthen it.

Also, I need to make a forward shoulder adjustment.

Comments please? More pictures on my blog.
------------------------------------------------------------------------------------------------


6/28/08 - Now that I have it overlapped and pinned correctly, it fits much better :) This is on over a jacket. I see pulling on the front and back above the hips so I think the side seams need to be let out below the waist. I did not put shoulder pads in but I think I have room. Any comments and suggestions would be greatly appreciated before I add the sleeves.


I have on a jacket underneath and I like the fit but then I usually like things larger than they should be. I cut a 16 due to the flat measurements and needing more ease than the pattern has built in to wear over jackets, etc. I usually cut a 14 for a top. Should I go down a size? I can tell this needs some work but don't really know where to start.

This is Simplicity 4084.

I am making View A front and View C back.