
A member here was kind enough to send me this on drafting a 2 pc sleeve from a pattern for a one piece.
It's what I would have done, had I taken the time. It's an art - not an exact science, the conversion of a balanced symmetrical sleeve pattern, so be prepared to have a couple of goes at it in the muslin stage.
I'm not going to leave this up long, so if you plan to do this, read through it and get the directions down. Consider this a lending of the info. I'm going to take this down when I return from my next trip, August 10.
The article is by Margaret Komives and appeared in the Dec/Jan 1991 issue of Threads.

Wednesday, July 30, 2008
Drafting a 2 piece sleeve using a one piece pattern.

Gry: My final collar
After a lot of experiments, I think I have finally found the perfect collar.

I think it fits the coat quite nicely. It is large enough to balance the A-line shape and has the right vintage feel to suit the coat.
I had quite a bit of fun constructing it. Details about the construction on my blog fromthestash.blogspot.com. However, I think I need a little help in how to sew this collar in the best way. Here are the pattern pieces. I know they look kind of weird, with the very curved stand and the straight collar piece, but this is what gives the draped effect. I am going to cut the stand grain-wise and interface as I would do with an ordinary collar stand. The problem is the collar pieces. Both over and under collar are cut on the bias without a centre back seam. Should I make a centre back seam? I am also uncertain if I should interface the collar? The interfacing I have bought is woven and fusible.
Here is a picture of the fabric. I don't know the name of the type of fabric, but it is a medium-heavy quality, tightly woven, almost like felted.
I just need to make a few adjustments on the pattern and draw linning pieces, then I am finally ready to cut the fabric.
Monday, July 28, 2008
Muslins: A Review
I offered to help Marji review the steps she has presented for analyzing a muslin. As a good teacher, Marji has modeled the thought-process for us. It is now up to us to help each other, and comment on each other's muslins. I have so appreciated the comments people have shared with me. Maybe we can each resolve to comment on at least one aspect of another person's work each day. Most of us participate in a project like this because we want to share the experience with like-minded people, and we all find the conversation motivating.
Marji sent me this quick checklist of what to look for in a fitting muslin.
First, start with an overall look: If it's so tight that...
- it doesn't hang straight from the shoulders
- it hangs up on your body instead of gliding over it
- it has horizontal wrinkles
- showing the strain as it goes around your body;
- showing where wider parts (as at hips) ride up to provide more room at waist
- it gaps where you pin center fronts together
Begin at the top, and making ONE change at a time:
Tany discussed the fit of the neckline of her coat. Els noticed that it seemed to stand away from her neck, and Tany checked it for stretch and shoulder slope. She adjusted the fit by changing the shoulder pads. See the first neckline here and the adjusted neckline here.
Check for fit at bust. The ripples on Poppy's muslin point to the bust, indicating she needs a full bust adjustment.
Check width and ease through waist/hip (horizontal ripples indicate it is too tight, vertical ripples mean it is too loose—the ripples may point to the problem)
Check that bust/waist/hip lines are horizontal/perpendicular to floor
Check that vertical seams hang straight —particularly side seams and CF/CB. Cafe Couture realized her vintage pattern is smaller than today's sizing. The center fronts do not line up in her first muslin. I've had persistent problems with my side seams, and finally have realized the pulling at my bust indicated a need for more length there. See here and here
You can also review examples of Marji's problem-solving by reviewing the posts linked below:
The Great Coat Sew-Along: Thoughts on The Fitting Muslin
The Great Coat Sew-Along: Q&A #2
The Great Coat Sew-Along: Constructing and Fitting the Muslin Part 1
The Great Coat Sew-Along: Constructing and Fitting the Muslin, Part 2
The Great Coat Sew-Along: Analyzing and Altering The Fitting Muslin
The Great Coat Sew-Along: Analyzing and Altering The Fitting Muslin, part 2, LisaC
The Great Coat Sew-Along: Marji: Tips for Presenting Your Fitting Muslin
The Great Coat Sew-Along: Index for Fitting the Muslin (Toile) posts
The Great Coat Sew-Along: Heidi's Muslin - V7979
I hope this helps! The Great Coat Sew-Along has become my favorite stop on the web! I love seeing what everyone is doing. Did you know that there have been 194 posts, not including the comments?
—MaryOK
Sunday, July 27, 2008
Claire S. - The Neck Fits !
"this post has been draft since Thursday, waiting for pics" - here we go...
I just didn't quite 'get' the instruction to cut a strip of muslin 2 sizes smaller from the neck of the original pattern and sew it on the muslin. BUT, I read (and re-read) all my books, searched the Net, and re-read the books again for making a neckline smaller. I'm not sure I followed 'proper' sewing tecniques but the neckline now fits alot better.
Those 1" seam allowances came in handy. I had already done a round back adj. and the CB was sitting ok on my neck. The long seams where the lapels will go had the 1" seam allowance. What I did was mark 3/4" on each shoulder seam seam allowance closer to the neck and just drew a line from CB to that mark, decreasing the neck width, and tapering back down the lapel to the original marking at the bottom. The S.A. on the back neckline was a tad short but it was just enough to get this basting stitch in.
How did I do ? and am I now ready to try the sleeves again ?
I've also noticed that although the line I drew from my ear to shoulder on each side matches up with its seam and looks ok, I only moved the shoulder seam forward on the RIGHT side. The seam on the left side is the original one which seems to have moved into place after adjusting for the high round neck and adding shoulder pads - is it possible to only have to move 'one' shoulder ?


Saturday, July 26, 2008
Mary OK Burda redrafted to Marfy F1022

Edited 7/26/08 to add:


Thank you, Digs, for noticing the forward tilt of the sideseam. This has been a persistent problem for me. I finally added a 3/4 " wedge of fabric at the bust line. This has brought the side seam back in line. Hooray!
7/20/08:
Here is the redrafted muslin, looking more like Marfy F1022!
I used the instructions in chapter 8 of Modern Pattern Design by Harriet Pepin (142)
- Add width to each panel according to Pepin's instructions on P. 19 of chapter 8
- Start the break 3" below bust line in front, side and back
- Draft the pleats to be 1" deep at the top and almost 3" deep at the hem, throwing the pleat on the bias
- Change the grain on the side front and side back pieces, so the grain line runs down the center of the panel (drawn on this muslin, but cut according to the old grain line)
- Reduce sleeve cap ease by 3/8". There is now 1 and 3/8" ease in the sleeve cap.


I'm still wondering if it tilts up too much in the front. I think there is enough room in the back:

I also tested the sleeve tab as shown in Burda 9/2006 #101. I don't like it. See how the sleeve is twisted on the model's arms? Makes ya wonder. . . . I will probably do a long sleeve vent instead, or a diagonal cuff in velvet (same as collar), as in the bottom picture:


Friday, July 25, 2008
Note from Marji
I'm working today and tomorrow on the blue silk dresses I need to make for dsd's to be in their uncle's wedding at the end of the month.
While taking breaks I'm going to work my way down through the muslin posts and try to leave everyone some feedback.
In order to keep information together, I'm using the admin priviledge of going in and adding the feedback as an edit right in the body of your post.
If you don't want me writing an edit on your post, email me and tell me to leave it alone. I won't be offended.
Funny, but now that I've gotten started on the coats, I want to keep going and get all my underlining mounted and the thread tracing done....and here I am back to working on silk dresses.
I'll post on my regular blog on Monday with the results of the dressmaking.
Marji
Thursday, July 24, 2008
Marji - my own projects

I'm hoping to get 3 garments made in the process of hosting this The Great Coat Sewalong.
I'd started to muslin the vintage pattern Vogue 1356 when I had occasion to flip through my whole collection of Patrones and Burda WOF looking for something else, and came across this.
I set everything aside for awhile and I evaluated muslins, worked on other projects and went on vacation. And, I searched for buttons - there are a lot of buttons on this coat. I found one locally that I loved, but it's a long discontinued button and doesnt' exist anywhere anymore.
I still need to trace this pattern, and make a muslin to see if it'll even work on me. And, I need to make a decision about buttons. This is where I am so far. The two on the right are my top choices at the moment. Input gladly accepted.
Meanwhile I had to begin working on a project for this TGCSA. The other two projects I had in mind when I started this group are short jackets. My need for coats is seriously dwarfed by my love for coats, and my existing collection. Whereas I will get significantly more wear from short jackets. It just doesn't get cold enough here, long enough, to warrant a lot of coat wearing.
The jacket I chose to work on first is a double breasted tailored number by Guy Larouche from Vogue. And of course, it's just gone OOP, although it is still available on their website.
I altered my pattern per my usual alterations for Vogue, and cut my typical 1" seam allowances, and constructed the muslin.
I wonder how many people have made this pattern as is?
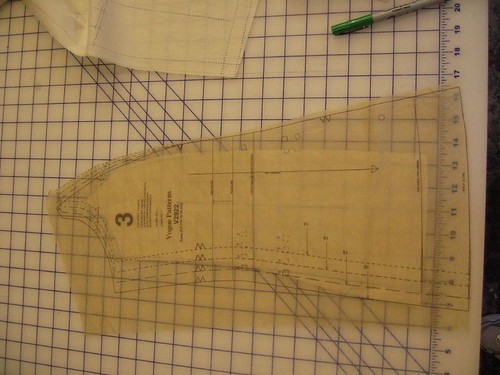
Look at the shape of the side front on the pattern tissue, and then look at my revised piece after alterations in the muslin. (the muslin pattern piece is under the pattern tissue). The front actually pleated along that princess line there was so much fabric and flare drafted into the original pattern.
There is that much flare built into the back too, however, since I would normally have had to make a sway back adj - which I didn't do since I was making a muslin and I wanted to see how much I would need in actuality rather than arbitrarily making the alteration on the tissue - and I would normally make a bit of allowance for my protruding backside, I didn't have to do much to the back. The flare built in by Vogue took care of that particular fitting issue for me.
The interesting thing is, this isn't supposed to be a flared jacket.
Other than that though, I added a bit more in the bustline at the princess seam, and added additional length to my CF panel, and the pattern fit ok.
For this jacket I'm using the double face cashmere/wool blend coating from Gorgeous Fabrics.
For the lining, I rifled through my rather prodigious stash and came up with the perfect use for a piece of Vietnamese Silk I have been hanging onto for the last 4 years trying to come up with a suitable use for it. These are very interesting jacquard woven silks, being a cottage industry in Vietnam, and being woven on some very old looms that some villagers have pulled out of storage. The woven width is less than 36". Somewhat recently I thought I saw some for sale at Waechters.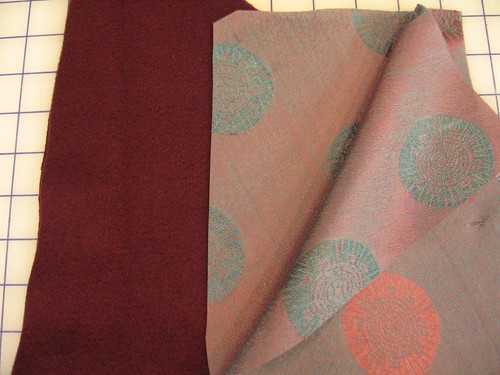
The colors are perfect both for the coating wool I'm using and for the wool that I'm planning a pair of pants from to wear with it. The pant wool has been in my stash since ... the days of cavemen? Since the 80's anyway.
The color of the jacket matches perfectly one of the colors in the plaid of the pant, and will be great together. (ignore the yarn).
Ignore also the fact that I've cut the lining out already. I'm trying to work ahead a bit to get some installments written in advance of when they're expected to be up. ;)
Wednesday, July 23, 2008
Rosemary: B4665
I've been quiet mostly pondering my adjustments to my muslin. I am getting quite happy with the fit. I have done the tuck above the armseye, voila the neck fits. This has left me thinking and pondering about most of my necklines, gaping v necks and bunching of extra fabric over my bust and of course why sometimes I can't move my arms! It is quite the learning curve, I can only compare it to therapy when you learn so much about oneself.
That said, I also added extra to drop the waistline, that put the hipline below my crotch. I still have the adjustments in the bust area and the shoulder width and I just took the collar out of the envelope. The upper collar seems to have the extra for the turn of cloth but I am still just looking at it. The lower collar is cut on the bias and seems to be longer in length and it also says stretch along the collar edge. Another ponder is in order.
Marji, I am not sure of my skills yet to recommend fitting advice to anyone yet. Looking forward to the next part of the process, but I must admit I have periods of being overwhelmed. (not quite the right word)
I'll post pictures soon.
Tuesday, July 22, 2008
Heidi: What stage are we at?
I am wondering what stage we are supposed to be at right now? I posted my muslin awhile ago but I haven't had any comments, so I don't know if I am on the right track. I don't want to adjust my muslin until I feel more confident about the changes.
Sorry if I am missing something here! I am following this blog intently because as an advanced beginner, I need all the help I can get constructing my first coat!
Marji:
Timeline is loose.
After I analyzed the fit of the first several muslins and tried to cover what to do with many of the fitting issues, I was hoping that there would be a bit more chat and give-and-take among the rest of the members. It's been a bit disconcerting to see so many comments "wait to see what Marji says." Obviously, since this is a sew-along and not a class, I can't possibly analyze the muslins of everyone. After I get the guide up for layout and cutting I'll try to go back through and at least look at everyone's muslins.
Heidi, I looked at and left comments on your muslin.
HEIDI's REPLY on Friday, 7/25:
Thanks for the feedback on my muslin. I took some better pictures and closeups of my sleeve and will post them soon. I am packing and getting ready to move across country in five days, so my "free" time is limited!
1/23/08
Monday, July 21, 2008
A Little Sewing on the Side: Comments on this muslin, please?
First off- just ignore the collar. I did not sew on the collar stand, so it looks weird. This pattern came out of Bernina My Label - the Three Quarter Length coat.
On my first try the shoulder seams were very odd- that back shoulder seam was fairly square and normal looking, but the front shoulder seam was extremely sloped. It hugged the armscye too tightly. So I made the front seam more square, to match the back and added a little extra to accomdate a shoulder pad. I am wearing shoulder pads here (yes, I have very slopey shoulders!) I did not add any extra to the sleeve cap. Do you think it needs more in the sleeve cap?
 This view, hanging in the window, shows the lines of the design pretty clearly.
 It feels comfortable. I suppose I could add a little more for a high rounded back.
 I like the length- comfortable for walking and getting in & out of a car. But I might prefer a collar with a lapel. Opinions welcome!
Marji: More edits on your posts: Robin, while it's looking close, I think that yes, you do need more ease through the body/hip area.
I also am concerned about the sleeve cap.
If you scroll back you'll find Els post on measuring the height of the sleeve cap relative to the measurement of your arm. I think you'll find if you do this exercise that you may need more height in the sleeve cap.
***The other thing you can do is release the stitching above the princess seams around the top of the sleeve, then put it on, and smooth the sleeve up over your arm and up over the seam allowance over the shoulder pad. It'll fall where it should, and I bet that it will show added sleeve cap height.
Jenny's finished muslin
Hello! I am having trouble uploading pictures to this blog for some reason, but I can get them up on my personal site, so if you'd like to see my muslin, please check it out here. I am very open to comments or suggestions.
Edited 17 July to add actual muslin post:
Yay! I finished my coat muslin and am about to rip it all apart to use as a pattern for my coat.
I'm very happy with the final fit, and I only had to make a few alterations. Again, the pattern I'm using is Marfy 1414. 
I think the pattern was cut perfectly for me except for the sleeves, which I will explain below. Here are my first pictures, before sleeves, collar, and details. I tried it on over a heavy sweater, the heaviest I would wear with this coat. The only thing I want to change is to close the slits in back to the bottom of my derriere. I think they look a bit high as is.


I was happy with the overall fit, so I finished the muslin. I like the collar and pocket placement. I think the collar will have more body and stand up in the coating fabric with interfacing. I already added three inches onto the sleeve pattern for my freakishly long arms, but I think I need to add another for the final pattern to be safe. The back belt looks a bit high to me. I will put it an inch or two lower on the final garment. Finally, the sleeves... I put in my right sleeve first and it was so tight I couldn't get my arm through with the sweater on. I also did a crummy job of setting in the sleeve cap. I put too much ease too far down. (This is my first Marfy pattern, and I'm getting used to very minimal pattern markings.) For the left sleeve, I left the sleeve cap seam allowance out another inch and put the ease in the top of the shoulder. I also left out the two long sleeve seams to 5/8 inch instead of the original 1 inch. This made the sleeve fit me and the coat much better. What do you think?


My left sleeve is the fixed version and the right sleeve is the poorly-fitting one. Finally, I didn't hem the coat or the sleeves on the muslin.
As you can probably tell, I'm very happy with my coat muslin. If you see problems, though, please let me know. This is my first muslin and my first coat, and I am open to constructive critiques. Thank you!
Claire S. - next question
I’ve done some of the recommended changes and have been mulling over some others.
From the last set of pics and suggestions/comments from both Marji & Linda I’ve done and observed the following:
- pinched out ¾" on each shoulder per Marji’s diagram
- took out the left sleeve and looked up how the shoulder pads are supposed to sit and pinned them in properly
- basted in the collar and both lapels in the original size.
The shoulder length feels a LOT better.
Unfortunately, the neck edge is still the same width, really wide.
I’m going to have to attempt Marji’s suggestion:
Marji - ‘Go back to your original pattern tissue, cut a slice of muslin from the CF around the neck (back too) cutting two sizes smaller, to bring that neck closer. Then stitch the muslin onto the muslin you are currently working with.’
I just can’t picture this.
How much is a slice ? How far down from the shoulders ? I’ve done a high round neck adjustment already and raised the back neck 1-1/4" - will I need to recreate this in the slice or do I cut a short piece that will sit above this adjustment. How do I go about blending the width of the smaller piece to the larger muslin I’m working on ? (Rapid fire questions - sorry :-) )
Note…I have yet to have DH measure the sleeve cap depth for the sleeve. Do I do this first for attempt to fix the neck width first ?
Marji - can you provide a pic or more instructions ? Thanks a bunchSunday, July 20, 2008
Susan S4084
Edit on Monday 7/21. This coat is not happening until I loose weight. No wonder I can't get excited about it - it looks horrible. I will concentrate on V2884 and save this one as a treat when I am a few pounds lighter.
I would love to comment on others muslins but don't really feel I have the knowledge required. I hope some of the more experienced sewers will help out. They all really seem to be shaping up.
Saturday, July 19, 2008
Gry's Collars
I am getting a little stressed about my coat. It is past mid-June and I am not ready to cut the fabric yet. I have bought the fabric and prepared it. I have been to the library and have found out how to do the hidden buttons thing. I have worked with my pattern, and, I think, improved it. But I am not ready yet. The thing is that I don't know what collar to put on the coat. Until I know this, I cannot finish my pattern and get started on the coat.
When I first made the muslin, I thought I would leave the coat collarless, but I have changed my mind. I think the A-line coat needs a collar to balance it. The question of the collar is no easy matter. I have made coat-sketches since last Christmas without coming to a conclusion. I decided I would try out some different collars on the muslin. A secondary motive for doing this was to get some experience in drawing collars. So far, I have sewn 4 collars and drawn a couple more. Here are the two first.
Collar 1: Mandarin collar A very classic collar, it makes the coat look like something from one of my vintage books. Perhaps, it is a little too classic for me? Besides, I don't think that the collar is big enough for the coat (I know, it is impossible to judge this from the picture).
Collar 2: Peter Pan collar This collar is very sweet, but not quite what I am looking for. The collar might work better if it was bigger.
I will add more collars and full-figure pictures on my blog.
Sigrid's muslins
Earlier today I posted my new muslins on my own blog, as I knew I was too late for the timeframe here. Just read Marji's post that it's still OK to publish muslin pictures, so here are mine. Finally decided on a fairly classic coat with notched collar, sleeve vents and longer than my first muslin. (if you're interested in how to sew a sleeve vent, I've added a tutorial on my blog, and plan to publish another method this week).
Els was so kind to help me decide on the interfacing, as the fabric is a bit too loosely woven for a coat fabric. Both Melissa and Els sent me samples for the interlining, as also an extra layer for warmth is needed. Thank you both for your help.
I've decided on BWOF 11-2006-108 (without the cuffs, but in a version with sleeve vents). In the end I feel more comfortable with a collar style like this.
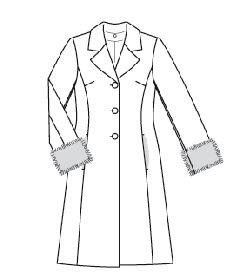
I made a partal muslin for the BWOF 12-2006-120 too, both muslins in size 44, but in the last one (shown on the left) I added quite a lot of space at hip height. As you can see from the other muslin, I need that.
| 11-2006-108 | 12-2006-120 | |
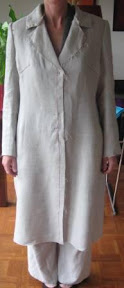 |  | The upper part of the coat with notch collar is (a bit) too wide. The other too snug. I wear the same winter jacket under each muslin. I'm unsure how this space will be filled by a more substantial fabric, combined with interlining. |
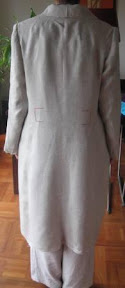 | 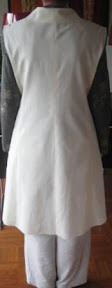 | Same story in the back, back of sleeve is a bit too much space perhaps. |
 | The side view of the coat I've decided that will be my pattern. Should I use 42 or even 40 for the upper part? Or would I need the space for fabric, interlining and lining? I appreciate your comments on this. | |
Friday, July 18, 2008


Subscribe to:
Posts (Atom)


